Development Kit Factory Programming
The 80-000347 Development Kit features a MityDSP-Pro module pre-programmed with a simple Application FPGA and DSP Application image.
Programming Files
These files can be obtained from the "Files" section of this wiki, account required.
Current Released Files: https://support.criticallink.com/redmine/attachments/download/11052/40-000037_F_RevC_.zip
Reprogramming Instructions
Recommended procedure using the serial interface and MityGUI
- Ensure that you have installed the latest MDK release and MityDSP GUI application. The MDK download can be found in the "files" section of the module wiki (https://support.criticallink.com/redmine/projects/dsp-products/files).
- Download the programming .zip files and extract them to your Windows desktop (or another known location).
- Begin with the MityDSP-Pro module installed in the MityDSP-Pro MDK Motherboard and power turned off to the motherboard.
- Connect a serial port from a PC to the debug DB9 serial interface of the MDK Pro Motherboard, JX. Depending on the cable used a NULL modem adapter may (or may not) be needed. Make note of the COM port assigned to this serial port interface on your PC.
- Open the "readme.txt" file that is included in the Programming Files ZIP downloaded from step #2. It describes which file to use for each field of the MityGUI. Please note that if the transfer of any one of the Bootstrapper, Bootloader FPGA or Bootloader files is interrupted or fails the module could become "bricked" and would need to be recovered over JTAG programming. We do not reccommend that these be updated, just the "Application" and "Application FPGA" files. The MityDSP GUI, by default, does not enable programming of the above 3 mentioned images. This is a safety precaution as incorrect programming of any of these images will render a MityDSP unusable without both a DSP emulator and an FPGA programmer to reload bootloader and bootloader FPGA code. To turn on the capability on use a text editor and edit the file ${MDK}\software\tools\MityDSPGUI.ini. Note - if the file doesn't exist (as is the case for a fresh install), simply launch the MityGUI.exe program and then close it down. The file should then be there.
In the .ini file under the [Parameters] section, modify the Authorized line to:Authorized=true
When you relaunch the application, you should see additional options for loading the above mentioned images as is shown in the figure below, otherwise only the first two options, Application and Application FPGA, will be shown:
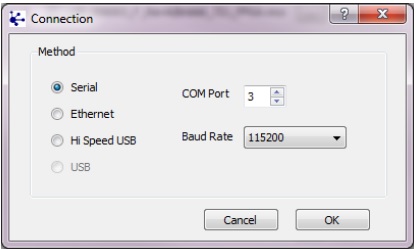
- Open the MityDSP GUI on your PC. Setup the MityDSP GUI to connect to the COM port found in the previous step by selecting the "Settings" menu from the top left and then "Connection". Select the "serial" radio button and set the COM port to that from the step before. Baud rate should be set to 115200. Then click OK.

- Use the [...] button next to each file type you want to re-program to open a windows file explorer window to select the necessary file. Ensure that the proper file is selected for each entry. (!)Do not use the "Configuration" or "Full Image" options!
- With all the files selected now apply power to the MityDSP-Pro Motherboard. You should see a message at the bottom of the MityDSP GUI application that now says "Connected".
- Check the "Configure" tab to ensure that the serial number of the module matches that of the unit being programmed. For reference the offset locations can be confirmed against the config_screenshot.png file included in the programming files zip directory.
- With all the information confirmed return to the "Download" tab and begin programming the files onto the module. Always program in the following order, omitting any files you are not programming:
- Bootstrapper
- Bootloader
- Bootloader FPGA
- Application FPGA
- Application
- Use the small green "Download" button next to each file type to send/program that file to the module. Ensure that you wait for each individual item to complete before proceeding to the next.
- Once all downloads have completed the MityDSP GUI can be closed and the motherboard/module powered off.
- At that time we recommend that you open a Serial Port Terminal application to the same COM port used for programming and set the baud rate and settings to 115200 8-n-1. You can then power the motherboard back on and should see the sample application run on the serial port.
Go to top

