Qt Starter Guide
- Table of contents
- Qt Starter Guide
This guide will step you through setting up and running a simple Qt Gui Application on your MityDSP-L138 system.
Prerequisites
- Make sure your system and build environment are setup to run a Hello World program on the ARM side.
- See Starter Guide for a step by step guide of this process.
- Make sure that a copy of the working Linux kernel is located at ${HOME}/linux-davinci on your Linux virtual machine
- See Step 8 of Linux Build VM for details on setting up the kernel project.
Building and Compiling the GUI
- Download the Qt SDK for Linux/X11 32-bit from here and install it on your Linux Build VM.
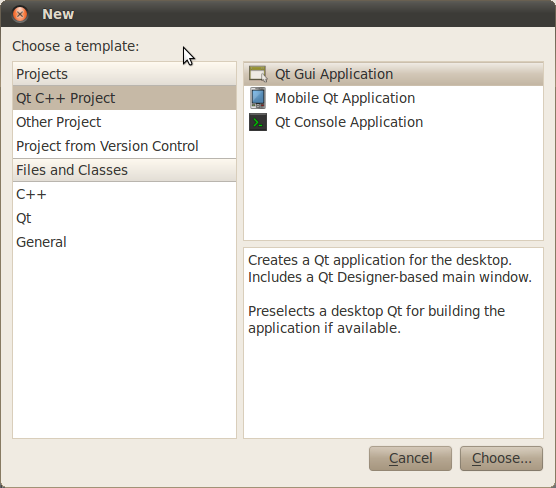
- Open Qt Creator and create a new Qt C++ Project targeted to be a Qt Gui Application.
- Give the project a name and click 'Next'.
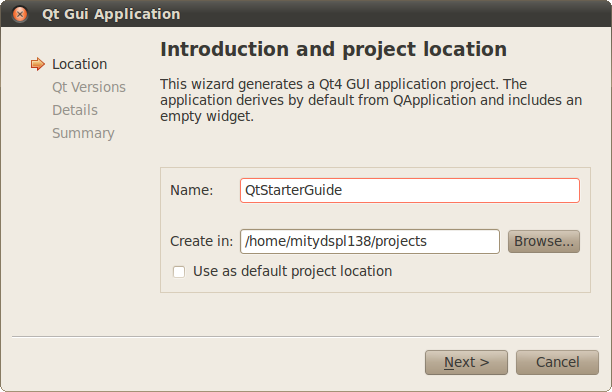
- Click 'Next' a few more times, and then 'Finish' (default settings are fine for this example).
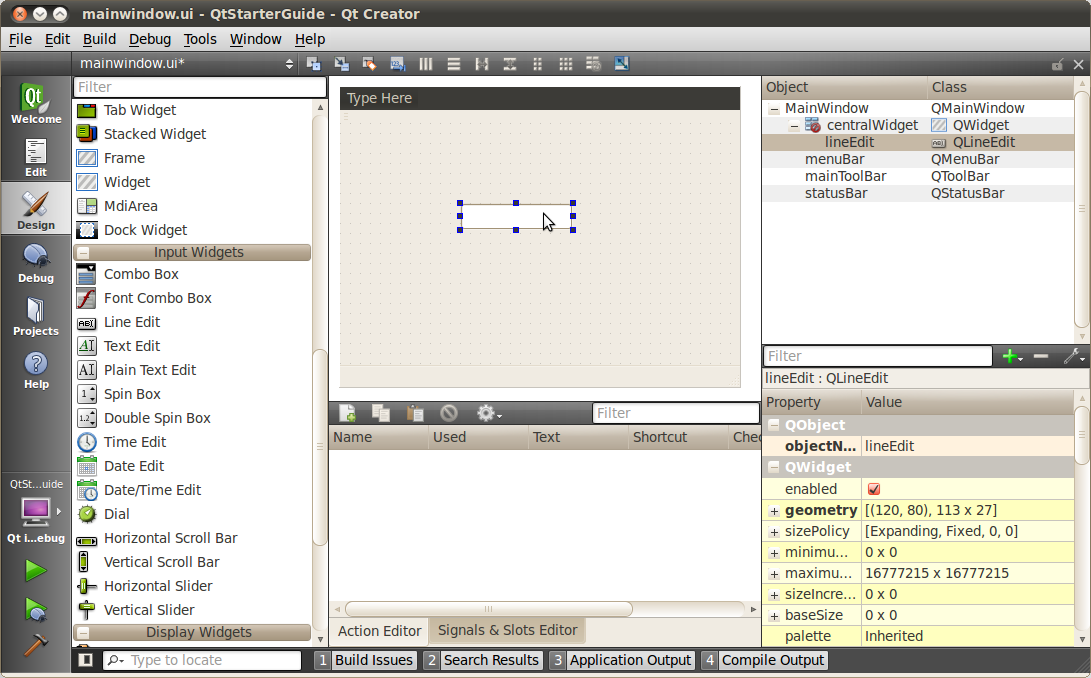
- Bring up the Design Editor by clicking the 'Design' icon in the left hand column of Qt Creator.

- Drag and drop a 'Line Edit' Input Widget from the left hand pane onto the central pane.
- Click on the 'Edit' in the left hand column of Qt Creator.
- Expand the project source tree and double-click on 'mainwindow.cpp' in the 'Sources' directory.

- Add 'ui->lineEdit->insert("Hello World!");' to the MainWindow class constructor.
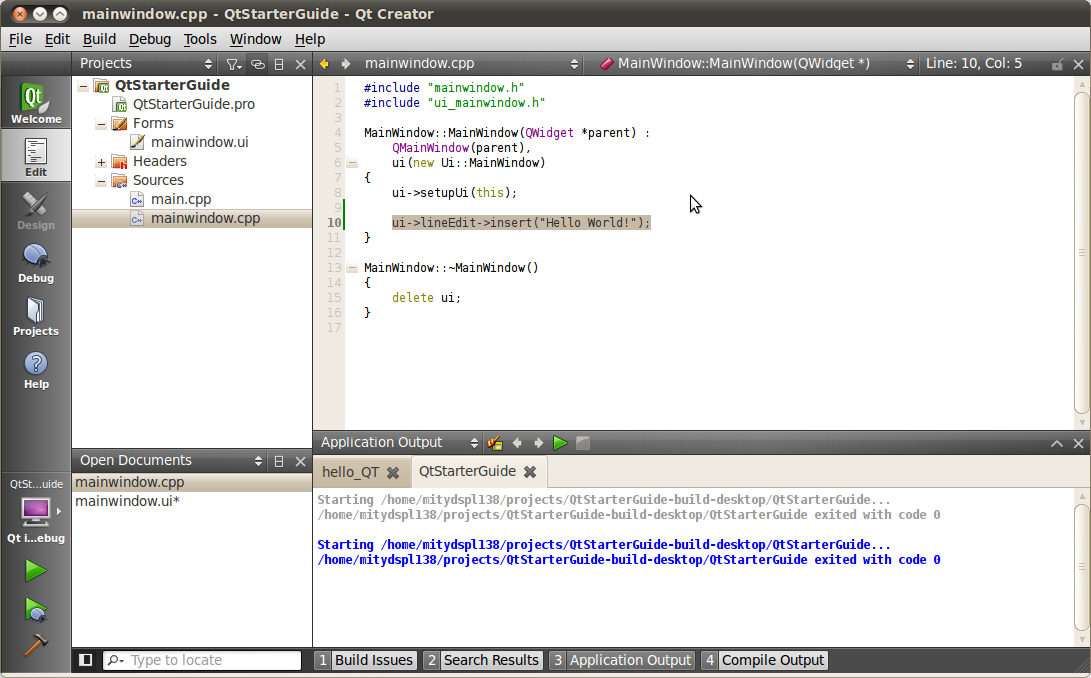
- Save and click the green arrow in the left hand column to debug the GUI in the Linux Build VM.
- Note: You may need to install g++ and other missing components on you Linux Build VM using apt-get:
mitydspl138@vm$ sudo apt-get install g++
- Note: You may need to install g++ and other missing components on you Linux Build VM using apt-get:
- You should see the 'Hello World!' message printed to the Line Edit Input Widget.

- Download and extract the latest GCC Toolchain to your Linux Build VM.
- Make sure you rename, move or delete the existing /usr/local/angstrom directory before you extract the new tarball.
- The latest toolchain tarball can be found here: GCC_Toolchain
- Open a terminal, navigate to the project directory and run the following commands:
mitydspl138@vm$ qmake
mitydspl138@vm$ make
- Copy the built executable to the MityDSP-L138.
Building the Kernel
- The latest kernel needs to be extracted to your Linux Build VM, configured to enable the framebuffer and rebuilt.
- Follow the steps in Linux_Kernel for extracting the kernel.
- Follow these additional steps for using the menuconfig interface to configure the kernel.
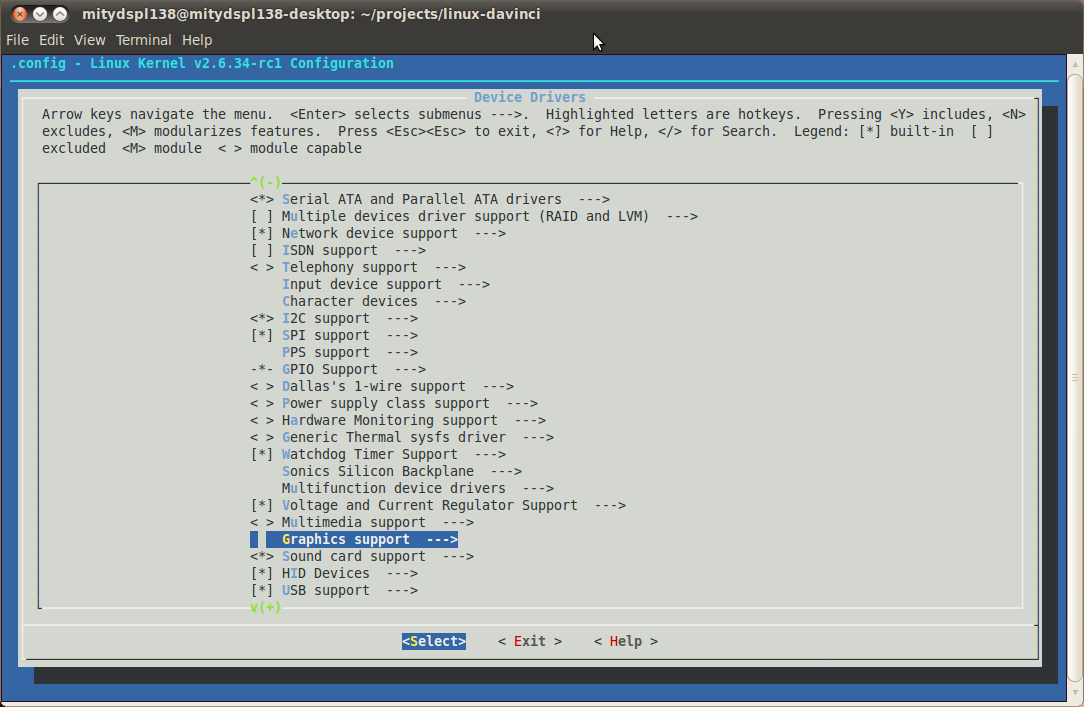
- Select 'Device Drivers' from the main menu.

- Scroll down and select 'Graphics support.'
- Enable 'Lowlevel video output switch controls.'
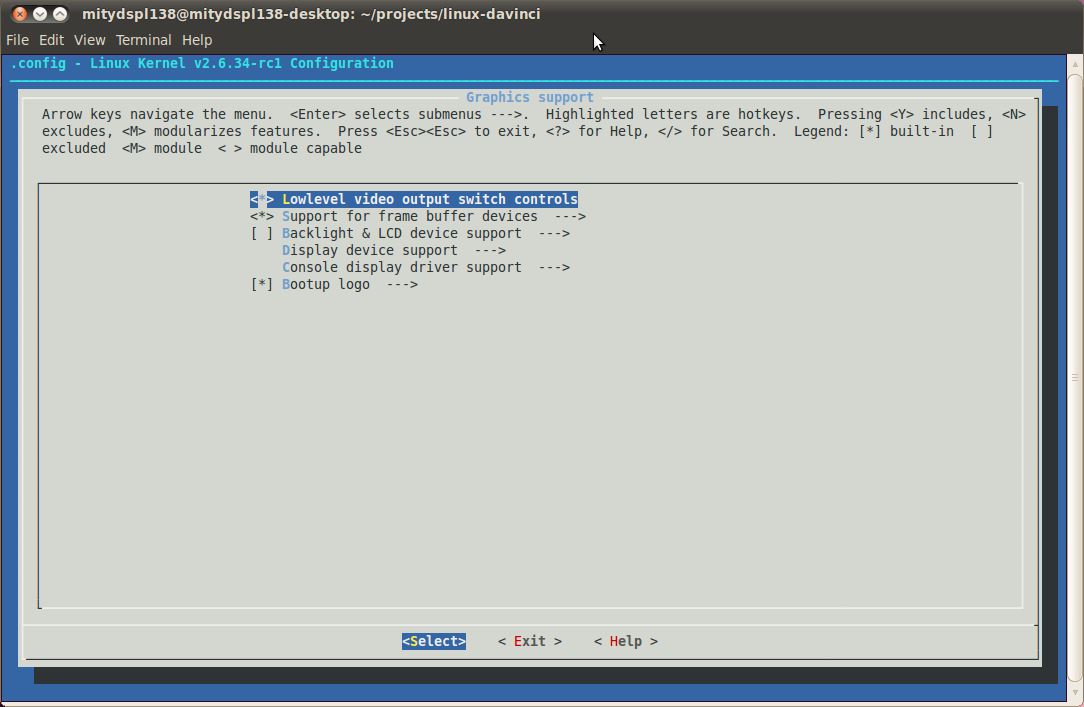
- Select 'Support for frame buffer devices.'
- Enable all the frame buffer device options.
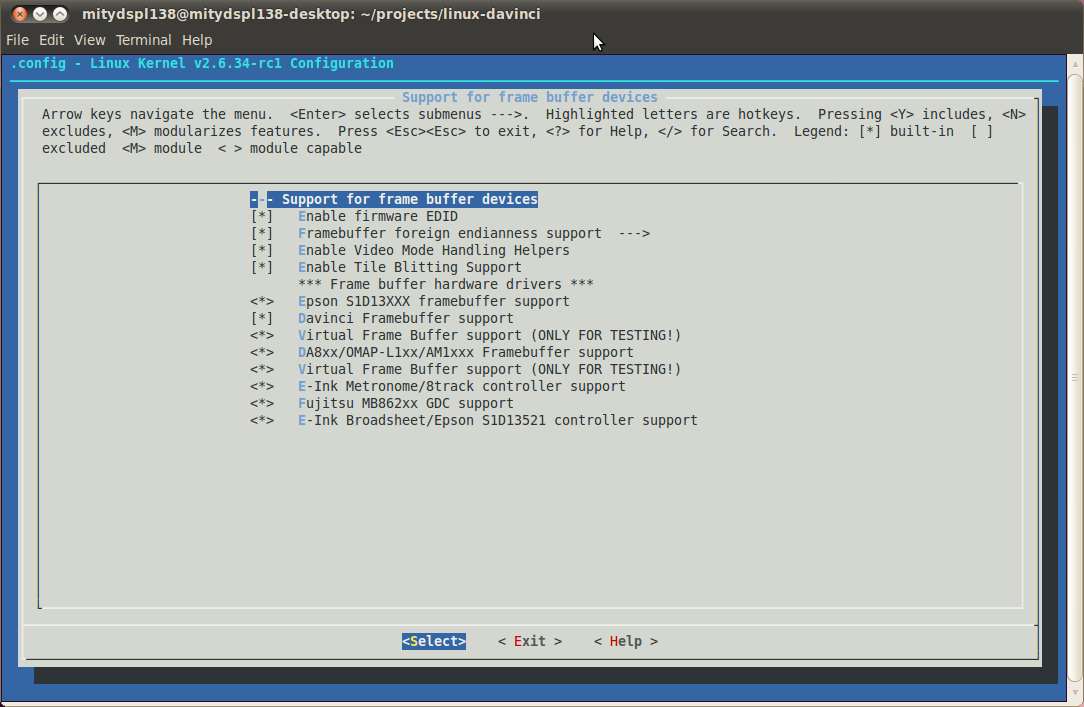
- Exit up one level.
- Select 'Console display driver support.'
- Enable all the Framebuffer Console support options.
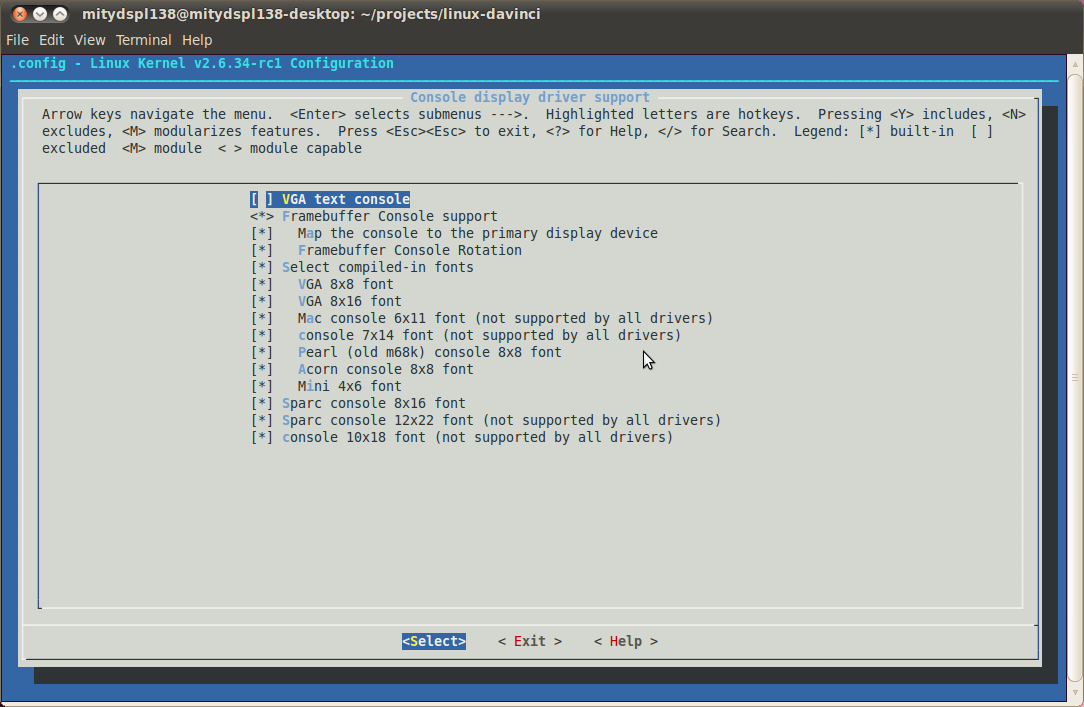
- Exit out of the configuration menu and save the changes.

- Finish rebuilding and installing the Linux Kernel as outlined in Linux_Kernel.
- Select 'Device Drivers' from the main menu.
- Follow these additional steps for using the menuconfig interface to configure the kernel.
Running the GUI on the MityDSP-L138
- Follow the steps in LCD_configuration to enable the framebuffer.
- Note: You may need to use the following FPGA drivers, which have been built against the latest kernel.
- Install qt-embedded on your MityDSP-L138 unit:
root@mityomap# opkg install qt4-embedded
- Run the Qt application:
root@mityomap# ./QtStarterGuide -qws
- You should see the GUI you created appear on the monitor connected to the Industrial IO Board.
Tip
Easier cross platform builds
Placing the following in your projects .pro file allows for easier development of your application for running on both your PC and L138.
contains(QT_ARCH,arm) {
    DEFINES += HOST_ARM
    CONFIG += arm # Add arm so we can use arm {}
}
It allows you to use #ifdef HOST_ARM in your code around sections that can't run on your PC. For example code that touches the gpio.
The "CONFIG += arm" line allows you to easily specify configurations in your .pro file that only apply when cross compiling. Example:
arm {
    SOURCES += arm_only_code.cpp
}
Adding DSPLink into your build
arm {
    MDK = $${MITYMDKPATH}
    exists( MDK ) {
        ERRMSG =  "You must define the environment variable MITYMDKPATH "
        ERRMSG += "to point to the directory where your MDK is installed. "
        ERRMSG += "For example on a VM: /home/mitydsp/MDK_2014-01-13 "
        ERRMSG += "Sorry... bye..."
        error ( $${ERRMSG} )
    }
    DSPLINK = $${MDK}/sw/3rdparty/dsplink_linux_1_65_00_03/dsplink

    LIBS += $${MDK}/lib/ARM/Release/dsplink.lib
    LIBS += $${MDK}/lib/ARM/Release/cmem.a
    LIBS += $${MDK}/lib/ARM/Release/edma.a
    LIBS += $${MDK}/lib/ARM/Release/libdaq.a
    LIBS += $${MDK}/lib/ARM/Release/libdsp.a
    LIBS += -pthread

    INCLUDEPATH += $${MDK}/sw/ARM/linux/libdsp
}
Have application show up full screen on 335x
- Add the following to the main window constructor. Assumes you've included the above cross platform tip.
#ifdef HOST_ARM
    this->showFullScreen();
#else
    this->setFixedSize(800,480);  // Set this to expected screen resolution
#endif
Remove need to specify "-qws"
- In the main.cpp file replace the QApplication line with the following. Assumes you've included the above cross platform tip.
#ifdef HOST_ARM
    QApplication a(argc, argv, QApplication::GuiServer);
#else
    QApplication a(argc, argv);
#endif