- Table of contents
- Module Debug Connection
Module Debug Connection
The MitySOM-5CSX features a 31-pin Hirose (DF9-31P-1V(32)) connector on the module, J2. This connector allows for both JTAG and TRACE connections through the use of breakout adapters that are available through Critical Link.
The pin-out for this connector, J2, on the module is as shown in the image below: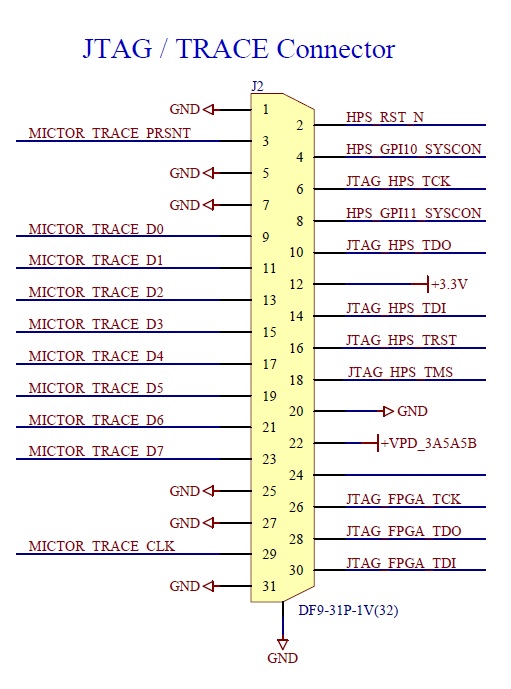
JTAG Only Adapter (80-000616)
Current development kits include a JTAG only adapter that is designed to allow access to both the HPS and FPGA chains. This adapter has no TRACE capabilities and requires that an external USB Blaster JTAG debugger be used. The following image shows the proper orientation/installation of the USB Blaster to the debug adapter.

Reset problem with some USB JTAG Blaster adapters
There is a known issue when using some USB JTAG Blaster adapters and the JTAG only adapter for the MitySOM-5CSx. It is reported that when used together the module/processor may reset and prevent debug from occurring.
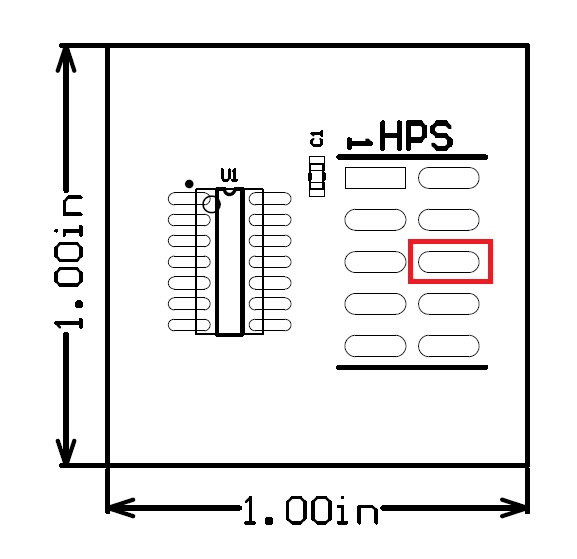
In this case we recommend that pin 6, shown below, of the "HPS" header either be removed or bent to a 90 degree angle so that it is not connected to the debug adapter.
JTAG Debug Pods
- Critical Link recommends the Altera/Intel USB Blaster II (Part Number PL-USB2-BLASTER) as our preferred POD due to the increased speed compared to the standard USB Blaster POD. It is available at nearly all distributors (Digikey, Mouser, Arrow, Etc.).
- Intel Product Page USB Blaster II: https://www.buyaltera.com/PartDetail?partId=5638362
- Another option is the Terasic branded USB Blaster POD (Part Number P0302) which is slower than the USB Blaster II we recommend but at a lower cost. It is available at nearly all distributors (Digikey, Mouser, Arrow, Etc.).
- Terasic Product Page: http://www.terasic.com.tw/cgi-bin/page/archive.pl?Language=English&CategoryNo=74&No=46
JTAG Debug from Linux Virtual Machine
It is possible to Debug/program the Cyclone V SoC processor from the Linux Virtual machine provided by Critical Link. Note however that the following steps must be taken if using the Linux 14.04 Virtual Machine image to allow proper configuration of the USB Blaster or USB Blaster II in the VM.
- Ensure that the Oracle Virtual Box Guest Additions/Virtual Box Extension Pack is installed on your host PC to allow for USB 2.0 support with the VM. You can enable/confirm USB 2.0 support for the VM by viewing the "settings"->"USB"->"Enable USB Controller"->"USB 2.0 (EHCI) Controller" radio button. You must do this when the VM is powered off to allow the settings change to occur.
- Once USB 2.0 support is enabled connect the USB Blaster/USB Blaster II to your PC, if not already connected. Note that a driver for windows does not need to be present for the blaster to work in Linux.
- Launch the VM. Once the OS has started go to the "Devices" menu of the Virtual Machine window (not in the Linux OS) and select "USB" and an entry for "Alter-USB Blaster" should be seen. Attach the USB Blaster device to the VM by selecting the entry, a check mark should then be present on the left side.
- Open a terminal in the Linux VM and run the "lsusb" command. You should see your blaster show up as a device ("Altera Blaster") in the list similar to the one below:
user@MitySOM-Dev:~$ lsusb
Bus 001 Device 001: ID 1d6b:0002 Linux Foundation 2.0 root hub
Bus 002 Device 004: ID 09fb:6001 Altera Blaster
Bus 002 Device 002: ID 80ee:0021 VirtualBox USB Tablet
Bus 002 Device 001: ID 1d6b:0001 Linux Foundation 1.1 root hub
- In the same terminal you need to add (or modify) the /etc/udev/rules.d/51-usbblaster.rules file to have the following text to set the device permissions properly:
# USB-Blaster SUBSYSTEMS=="usb", ATTRS{idVendor}=="09fb", ATTRS{idProduct}=="6001", MODE="0666" SUBSYSTEMS=="usb", ATTRS{idVendor}=="09fb", ATTRS{idProduct}=="6002", MODE="0666" SUBSYSTEMS=="usb", ATTRS{idVendor}=="09fb", ATTRS{idProduct}=="6003", MODE="0666" # USB-Blaster II SUBSYSTEMS=="usb", ATTRS{idVendor}=="09fb", ATTRS{idProduct}=="6010", MODE="0666" SUBSYSTEMS=="usb", ATTRS{idVendor}=="09fb", ATTRS{idProduct}=="6810", MODE="0666" - Reboot the Linx VM (recommended) or Re-load the udev rules by entering the following command in the same terminal session
sudo udevadm control --reload
- You can the launch Quartus and utilize the JTAG Debug/Programmer features by selecting the "USB-Blaster" device.
- Alternatively you can run a scan with the "jtagconfig" command from a terminal on the Linux VM as follows
user@MitySOM-Dev:~$ /home/user/altera/14.1/quartus/bin/jtagconfig 1) USB-Blaster [2-2]
  02D020DD   5CSEBA6(.|ES)/5CSEMA6/..
  4BA00477   SOCVHPS
- If connecting to the target device fails you may need to install libudev1 per this wiki (https://www-acc.gsi.de/wiki/Timing/QuartusInstallUbuntu1404.) from a terminal.
sudo apt-get install libudev1:i386
- And create a sim link
sudo ln -sf /lib/x86_64-linux-gnu/libudev.so.1 /lib/x86_64-linux-gnu/libudev.so.0
- If connecting to the target device fails you may need to install libudev1 per this wiki (https://www-acc.gsi.de/wiki/Timing/QuartusInstallUbuntu1404.) from a terminal.
- Alternatively you can run a scan with the "jtagconfig" command from a terminal on the Linux VM as follows
Go to top

