Setting up a RAM file system
The goal of this guide is to show how to setup the 5CSX dev kit to run off a RAM file system. In order to do this this guide will show how to create the RAM file system using Yocto and create a SD card that will be used to boot to uBoot. Once in uBoot the dev kit will copy the need files into RAM (the kernel, device tree, and compressed root file system image) and then boot from RAM from then on.
NOTE: This guide is geared to be used from a linux environment
Creating the root file system image
The root file system will be put into inside a cpio container, which is then compressed with gzip. This step is easily done with hob, which is a GUI interface for yocto. The following steps require hob and yocto to be setup, which can be done by following this guide: Building the Root Filesystem using Yocto.
- Open hob
- Select mitysom-5csx for machine type and mitysom-5csx-dev-kit for recipe
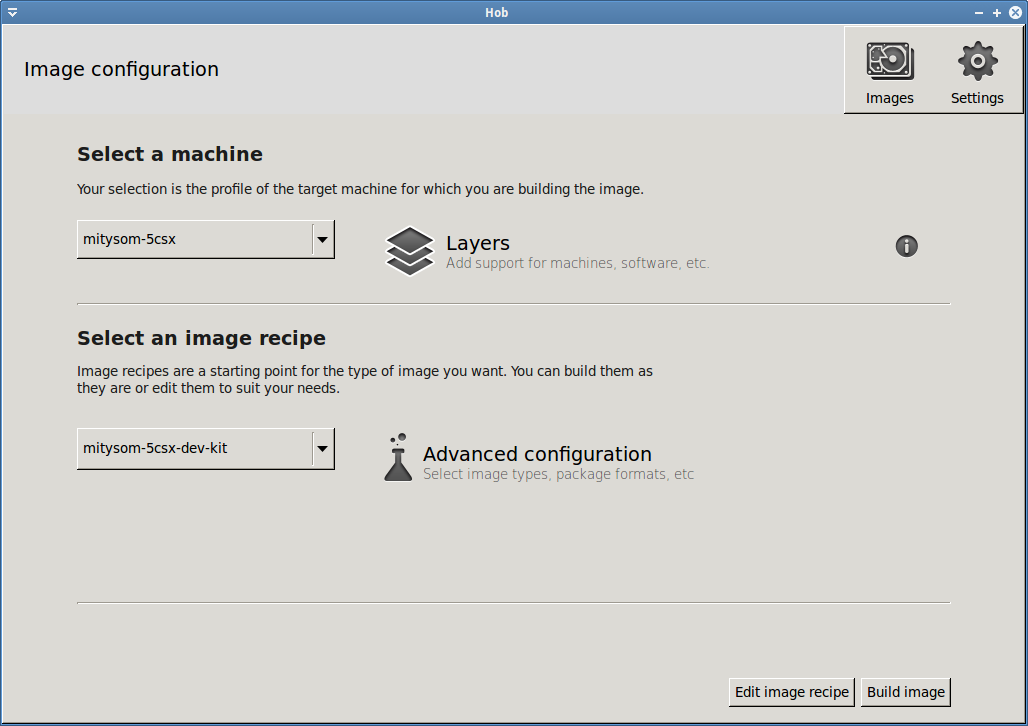
- Click the Advanced configuration button
- Make sure cpio.gz is checked and click save
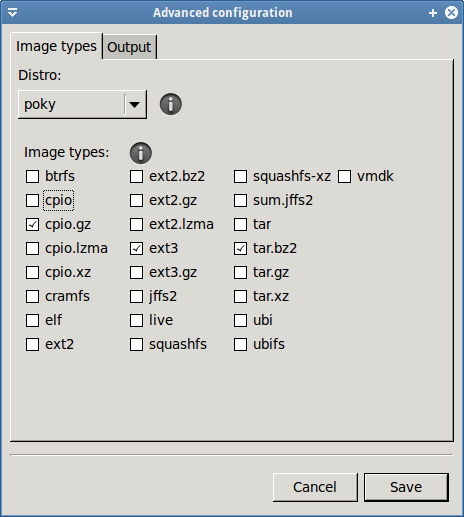
- Build the image
From the build directory the cpio.gz can be found in tmp/deploy/images/mitysom-5csx/
Next the cpio.gz will need to be converted to a format that uBoot can parse.
Creating the initramfs image
In order for u-boot to recognize the compressed file system (cpio.gz) it needs a header added to it. This can be done by using the mkimage command.
- Enter the altera command shell
>~/altera/14.1/embedded/embedded_command_shell.sh
- run mkimage on the compressed root file system image
mkimage -n 'Ramdisk Image' -A arm -O linux -T ramdisk -C gzip -d mitysom-5csx-dev-kit-mitysom-5csx.cpio.gz initramfs.uImage
- initramfs.uImage is the compressed file system iamge with the uBoot headers
Next an SD card needs to be made that the dev kit can boot off
Creating the SD card
This example will use a SD card in order to boot to uBoot and to hold the needed files to copy into RAM before booting into linux. Once uBoot copies the kernel, device tree, and compressed root file system to RAM the SD card is no longer used.
Partitioning the SD card
The SD card will have 2 partitions: a non-formated partition that will house the preloader and uboot, and a EXT3 partition that will hold the kernel, device tree, and compressed root file system image.
Note: in this example the SD card is seen as /dev/sdX- Start fdisk to do the partitioning
sudo fdisk /dev/sdX
- View the partitions on the SD card, this can be done with the p command in fdisk
- Remove and partitions currently on the SD card, this can be done with the d command in fdisk
- Create a new partition that is 1M
n
p
1
press enter to use default
+1M
- Change the Id for the partition to A2 so the boot ROM will be able to find it, this will be the partition uboot and the preloader will be on
t
a2
- Create the second partition that will hold the root file system image, device tree, and kernel
n
p
2
press enter to use default
press enter to use default
- Print out the partition table, this can be done with the p command in fdisk
Command (m for help): p

Disk /dev/sdX: 1977 MB, 1977614336 bytes
110 heads, 61 sectors/track, 575 cylinders, total 3862528 sectors
Units = sectors of 1 * 512 = 512 bytes
Sector size (logical/physical): 512 bytes / 512 bytes
I/O size (minimum/optimal): 512 bytes / 512 bytes
Disk identifier: 0x000b7678

   Device Boot      Start         End      Blocks   Id  System
/dev/sdX1            2048        4095        1024   a2  Unknown
/dev/sdX2            4096     3862527     1929216   83  Linux
- Write the partition table to the SD card, this can be done with w
- Format the second partition as EXT3
sudo mke2fs -t ext3 /dev/sdX2
The SD card is ready for files
Setting up the A2 partition
The A2 partition is what the BootROM keys off of to look for the preloader. Both the preloader an uboot are written to this partition.
- Please follow Building U-Boot and Preloader to recreate the preloader and uboot
- After building the preloader and uboot there will be 2 files that are of importances in the spl_bsp folder
preloader-mkpimage.bin
uboot-socfpga/u-boot.img
- Use the dd command to write each file to the SD card
sudo dd if=preloader-mkpimage.bin of=/dev/sdX1 bs=64k seek=0
sudo dd if=uboot-socfpga/u-boot.img of=/dev/sdX1 bs=64k seek=4
- Create a uboot environment binary setup to handle booting off the compressed root file system image. This step expects the current directory to be the spl_bsp folder. The environment text file: uBootInitRamFsEnv.txt
uboot-socfpga/tools/mkenvimage -s 4096 -o ubootenv.bin uBootInitRAMFsEnv.txt
- Write the uboot environment binary to the SD card
sudo dd if=ubootenv.bin of=/dev/sdX bs=512 seek=1
Setting up the EXT3 partition
The EXT3 partition is used just as storage for the root file system image, kernel, FPGA image, and DTB. They are moved into RAM during uboot and not used when in linux.
- Mount the second partition. This guide will expect the second partition to mounted to /mnt
sudo mount /dev/sdX2 /mnt
- Copy the root file image over, it should be in tmp/deploy/images/mitysom-5csx/ of the yocto build
sudo cp initramfs.uImage /mnt
- Copy over the kernel and device tree, these should also be in tmp/deploy/images/mitysom-5csx/ of the yocto build
sudo cp uImage /mnt
sudo cp uImage-socfpga_mitysom5csx_devkit.dtb /mnt/socfpga_mitysom5csx_devkit.dtb
- Convert and copy over the FPGA image, instruction and be found here: Programming the FPGA
cp mitysom_5csx_dev_board.rbf /mnt/mitysom_5csx_dev_board.rbf
- Unmount the SD card
sudo umount /mnt
The SD card is now ready to be used in the 5CSx dev kit.