Sample Project Debug
At this point the "readsysid" application should have been built through the Eclipse project.
- The application built for the MitySOM-5CSE ARM processor is named "main" and should now reside in the project directory:
/home/user/projects/mitysom_5cse_dev_board/dev_exp_5cse_l2_3y8_base/software/readsysid
user@MitySOM-Dev:~/projects/mitysom_5cse_dev_board/dev_exp_5cse_l2_3y8_base/software/readsysid$ ls
aclocal.m4      config.h.in    INSTALL      Makefile.in  sysid.o
AUTHORS         config.log     main         NEWS         sysid_regs.h
autom4te.cache  config.status  main.cpp     README
build-aux       configure      main.o       stamp-h1
ChangeLog       configure.ac   Makefile     sysid.cpp
config.h        COPYING        Makefile.am  sysid.h
- Ensure that your module/development kit has the module powered on, serial port connected, Ethernet port connected and that it has an IP address as we will transfer the application using SCP over the Ethernet interface.
On the serial port of the module/dev kit ensure that the module has an IP address, modules/dev kits use DHCP by default.root@mitysom-5csx:~# ifconfig eth0 Link encap:Ethernet HWaddr 40:d8:55:17:c1:75 inet addr:10.0.102.88 Bcast:10.0.255.255 Mask:255.255.0.0 inet6 addr: fe80::42d8:55ff:fe17:c175/64 Scope:Link UP BROADCAST RUNNING MULTICAST MTU:1500 Metric:1 RX packets:873221 errors:0 dropped:0 overruns:0 frame:0 TX packets:142 errors:0 dropped:0 overruns:0 carrier:0 collisions:0 txqueuelen:1000 RX bytes:67350388 (64.2 MiB) TX bytes:29024 (28.3 KiB) Interrupt:152
In this case our module is located at 10.0.102.88 - Transfer the application (main) to the module/dev kit's /home/root/ directory using SCP from your Virtual Machine (host PC) where the project was built in Eclipse.
user@MitySOM-Dev:~/projects/mitysom_5cse_dev_board/dev_exp_5cse_l2_3y8_base/software/readsysid$ scp ./main root@10.0.102.88:/home/root/
main                                          100%   17KB  17.1KB/s   00:00
- Ensure that the module has been programmed with the FPGA image for the MitySOM-5CSE module to support the readsysid example.
- Execute the application on the "target" MitySOM-5CSE module. The output should be similar to the following.
root@mitysom-5csx:~# ./main
FPGA SYSID - 00000003 : Wed Nov 12 21:14:50 2014
- Now we will run the application using GDB Server to allow our Host VM to allow Eclipse to connect for remote debug.
root@mitysom-5csx:~# gdbserver :12345 ./main
Process ./main created; pid = 291
Listening on port 12345
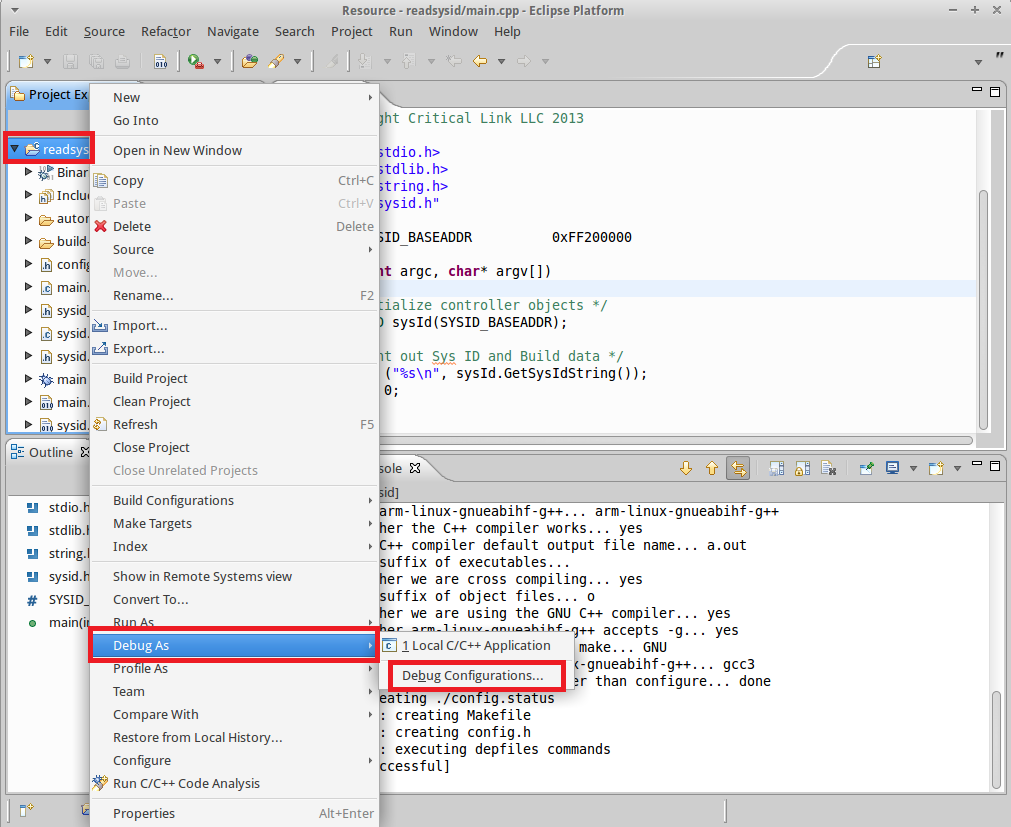
- We will now setup a remote debug configuration in Eclipse. Right-click on the project and select "Debug As" and then "Debug Configurations".
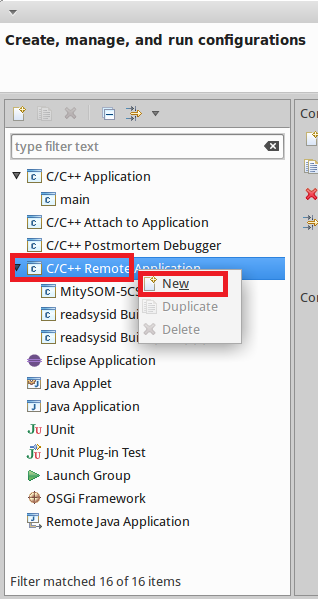
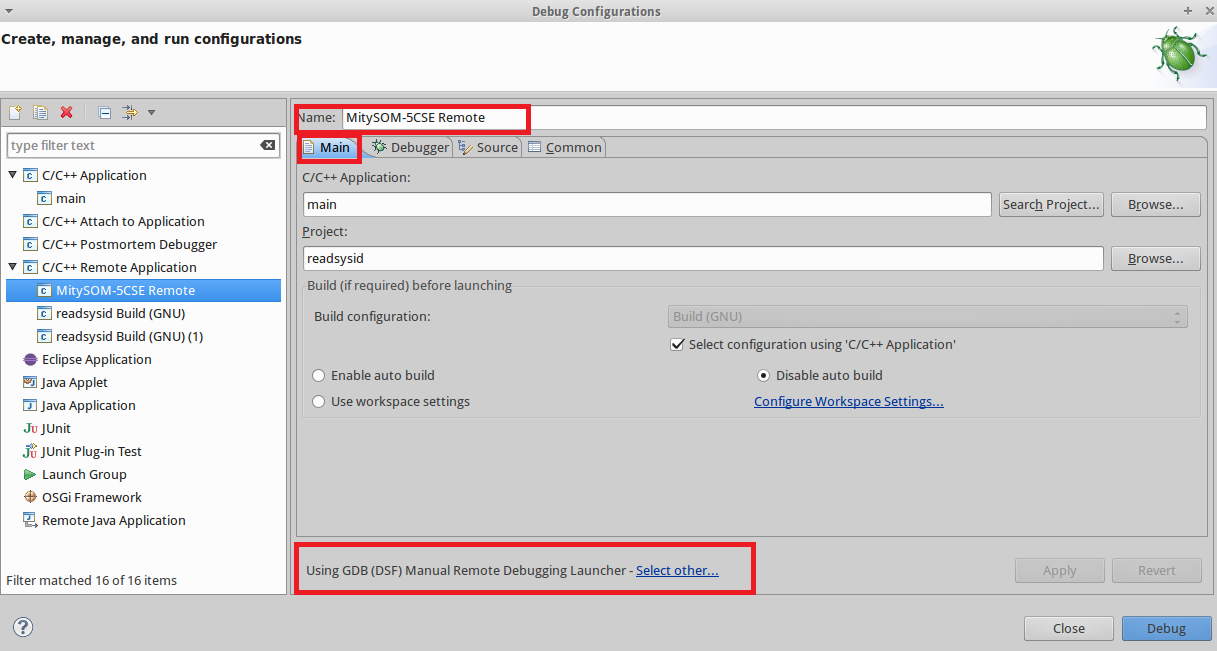
- Make a "New" debug configuration by Right-clicking on the C/C++ Remote Application option and name it "MitySOM-5CSE Remote"
- Choose the "Select other" option at the bottom to use a "GDB (DSF) Manual Remote Debugging Launcher"
- In the "Debugger" tab set the GDB debugger as shown (/opt/poky/1.5.4/sysroots/x86_64-pokysdk-linux/usr/bin/arm-poky-linux-gnueabi/arm-poky-linux-gnueabi-gdb):

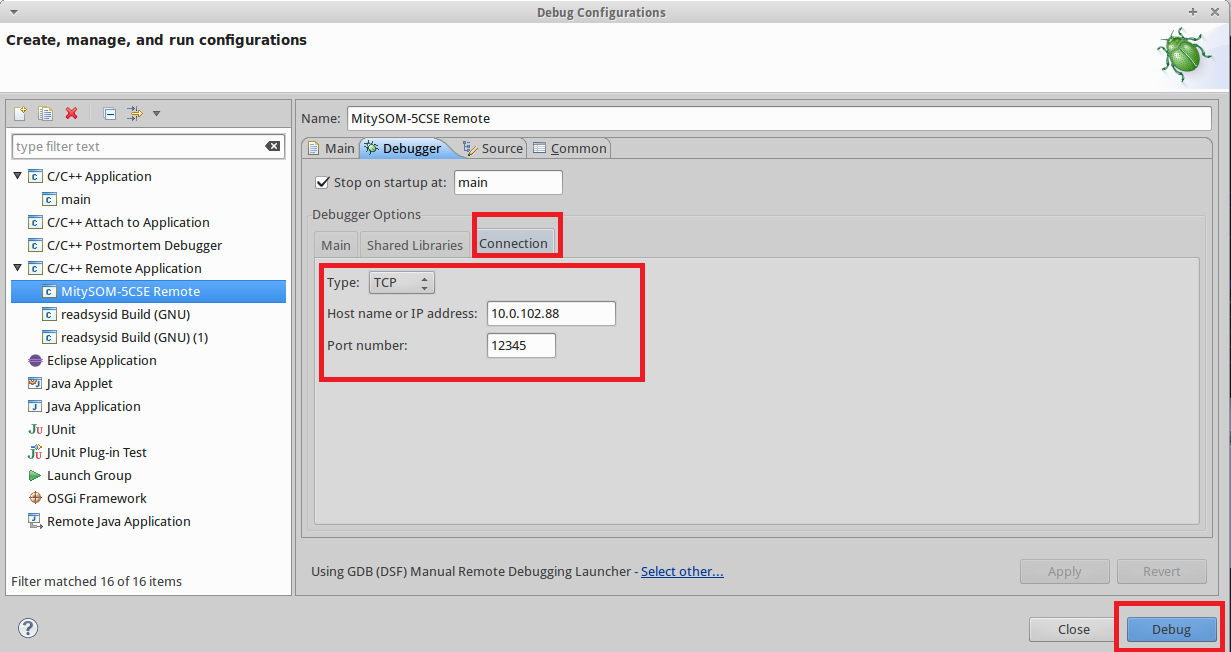
Note that previously for the Altera Embedded toolchain the entry was /home/user/altera/14.1/embedded/host_tools/mentor/gnu/arm/baremetal/bin/arem-altera-eabi-gdb - Finally set the "Connection" tab of the "Debugger" tab so that the Type is TCP, the address is that of your module (10.0.102.88) and the port number of 12345. Now press the "Debug" button to begin debugging. You may be prompted to switch to the "Debug View", select OK.
- Once Eclipse connects to the module it's serial port should show the following output:
Remote debugging from host 10.0.102.102
- In the Eclipse debugger select the "Resume" button to allow the application to execute on the remote target (module).

- The following should now be printed on the modules serial port.
FPGA SYSID - 00000003 : Wed Nov 12 21:14:50 2014

Child exited with status 0
GDBserver exiting
- You can now restart the GDBserver and application on the target module and begin using breakpoints and other debug features within Eclipse on the Host VM.