Upgrading Bootloader Images
This page describes the steps needed to update your MityDSP bootloader DSP application, bootstrapper DSP application, and bootloader FPGA image.
Warning: the methods described below are not recommended unless you have a specific reason to upgrade the bootloader firmware on your MityDSP. Failure to follow the steps outlined below can result in a "bricked" MityDSP module required reloading via emulator pod or by Critical Link at factory. Before following this procedure, users may want to familiarize themselves with the boot process described in the Bootloader Overview.
Updating the bootloader using the MityDSP GUI Loader
Note: These instructions were written using images and the software found in version 2.12.1 of the MDK.
The MityDSP GUI is installed as a part of the MDK software package. This application is used to typically program the user Application FPGA and user Application files. There is a users guide for the MityDSP GUI in the "Help" section once the GUI is installed.
The latest MDK, with MityDSP GUI, can be downloaded from the files section
For the purposes of these instructions ${MDK} means the installation of the MDK root path, typically something like "C:\MityDSP\2.12".
There are 3 elements of the bootloader firmware that are involved in the MityDSP boot process: The bootstrapper, the bootloader, and the bootloader FPGA image. For the DSP software elements, the bootstrapper and bootloader image revision history can be found in the MDK documentation under the software release notes (C:\MityDSP\2.12\sw_release_notes). The change history for these software images should provide information as to whether you need to upgrade or not.
After these components are loaded the module then loads the application FPGA and application DSP code which is always customer specific.
The Bootloader FPGA from factory provides 2 UARTS and a base module. It will allow loading of firmware via serial port only. If this is all you require, you do not need to update the FPGA image. Typically, users upgrade the bootloader and the bootloader FPGA, and the bootstrapper is not upgraded. The most common reason for upgrading the factory bootloader firmware include:
- Users require downloading via High Speed USB.
- Users require downloading via Ethernet
- Certain application GPIOs connected to the FPGA (by default tristated, but pulled high with FPGA internal pullups) require control as soon as possible after the power on sequence.
The image locations are found in the MDK at ${MDK}/software/bin/boot, and the following is provided:
| File | Platform | Description |
| Bootloader.hex | MityDSP and MityDSP-XM | FLASHABLE image of the Bootloader DSP application |
| Bootloader.out | MityDSP and MityDSP-XM | Emulator Downloadable image of the Bootloader DSP application |
| BootloaderPro.hex | MityDSP-PRO | FLASHABLE image of the Bootloader DSP application |
| BootloaderPro.out | MityDSP-PRO | Emulator Downloadable image of the Bootloader DSP application |
| Bootstrapper.hex | MityDSP and MityDSP-XM | FLASHABLE image of the bootstrapper DSP application |
| BootstrapPro.hex | MityDSP-PRO | FLASHABLE image of the bootstrapper DSP application |
Step 1 - Enable Admin Mode on the GUI
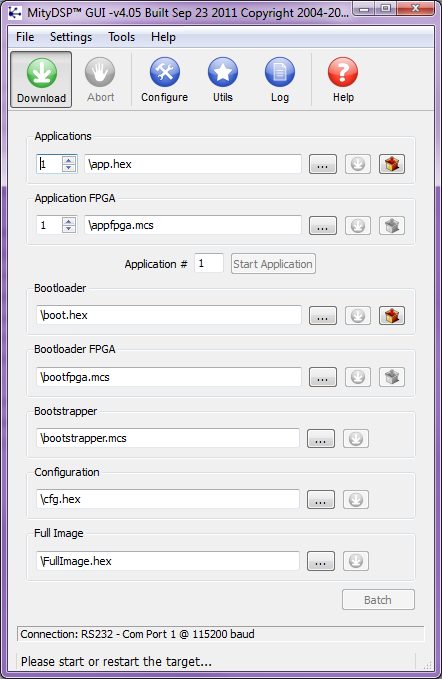
The MityDSP GUI, by default, does not enable programming of the above 3 mentioned images. This is a safety precaution as incorrect programming of any of these images will render a MityDSP unusable without both a DSP emulator and an FPGA programmer to reload bootloader and bootloader FPGA code. To turn on the capability on use a text editor and edit the file ${MDK}\software\tools\MityDSPGUI.ini. Note - if the file doesn't exist (as is the case for a fresh install), simply launch the MityGUI.exe program and then close it down. The file should then be there.
In the .ini file under the [Parameters] section, modify the Authorized line to:
Authorized=true
When you relaunch the application, you should see additional options for loading the above mentioned images as is shown in the figure below:
Connect to your target platform
This is the same as normal image programming.
Step 2 - Upload the Bootloader DSP Image (if required)
Under the Bootloader section, select the appropriate DSP bootloader image (a .hex file) from the table above. Select the download button. Warning you must let this operation complete or you will rendor your MityDSP inoperable.
Step 3 - Upload the Bootloader FPGA (if required)
Under the Bootloader FPGA section, select the appropriate FPGA image (a .hex file). Usually this is the same as your main application FPGA image. Select the download button. Warning you must let this operation complete or you will rendor your MityDSP inoperable.
Step 4 - Upload the Bootstrapper Image (if required)
Under the Bootstrapper section, select the appropriate bootstrapper image (a .hex file) from the table above. Usually this is the same as your main application FPGA image. Select the download button. Warning you must let this operation complete or you will rendor your MityDSP inoperable.
Go to top

