MIPI Cameras
The MitySOM-QC6490 Devkit supports image and video capture via the MIPI CSI interfaces ( Note that if you are using the 1.0 SDK, CSI0 is the only MIPI CSI interface supported).
Development Board Configuration
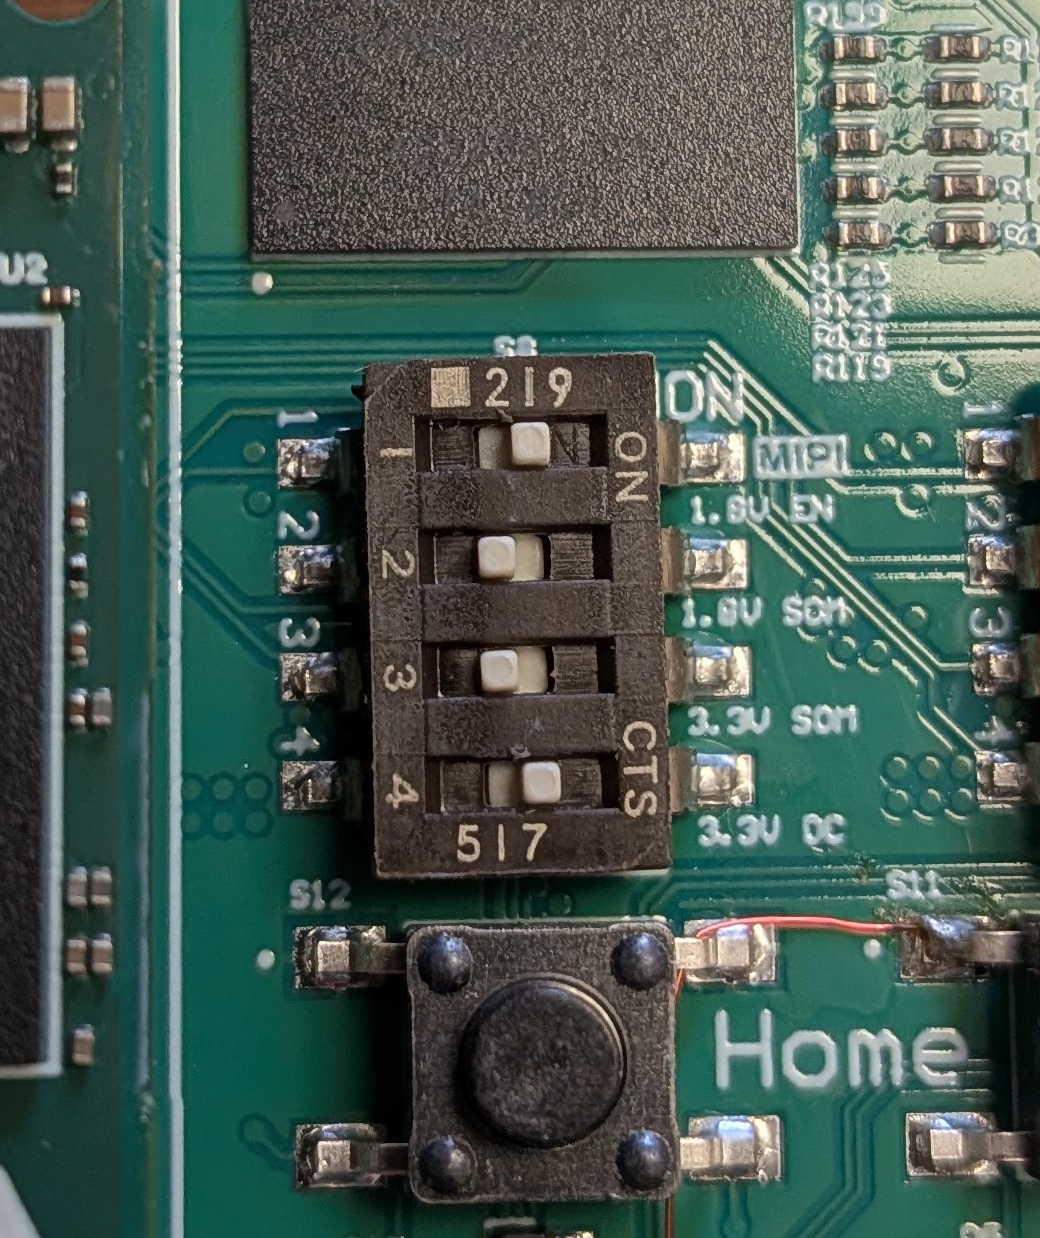
Ensure that Switch S8 is set properly.- Switch 1 should be set to enable MIPI, which is a top level enable for 1.8 V for the MIPI interface
- Switch 2 can be either set or not set
- If Switch 2 is not set the 1.8V comes from the DC supply on the Development Kit
- If Switch 2 is set the 1.8V comes from the SOM
- Switch 3 should NOT be set for Rev 1 or 2 of the Development Board as 3.3V from the SOM may actually be a higher volage. See MitySOM-QC6490 Development Kit Datasheet for further details
- For Rev 3 onward, Switch 3 can be either set or not set.
- If Switch 3 is not set the 3.3V comes from the DC supply on the Development Kit
- If Switch 3 is set the 3.3V comes from the SOM
- For Rev 3 onward, Switch 3 can be either set or not set.
- Switch 4 should be set to enable the 3V3 CSI from the DC supply
Note that the connector on the Development Board is a Hirose FH12A-22S-0.5SH(55) (22 pin 0.5 mm pitch).
Also note that when installing the cable the dark brown latch on the connector should be up and the cable should be inserted between the dark brown latch and light brown body with the pins on the cable facing up. Once the cable is in position the dark brown latch should be pushed down to secure the cable.
Please see the picture below for an example of a properly connected cable:

Known Working Cameras
The Waveshare OV9281-120 Mono Camera was used to validate the MIPI CSI interface. Note that this module has a 15 pin 1.0 mm pitch interface and you will need to acquire a 15 pin 1.0 mm pitch to 22 pin 0.5 mm pitch adapter cable in order to use this module on the Development Board.
The The Arducam IMX577 has also been validated on the MIPI CSI interface. If you are interested in integrating support for this camera module, please reach out via the forums.
Capturing Single Images
- Ensure the qcom-multimedia-image has been flashed onto the MitySOM-QC6490.
- You can verify which image you are working with via the following command:
root@qcs6490-mitysom-devkit:~# cat /etc/buildinfo | grep IMAGE_BASENAME
IMAGE_BASENAME = qcom-multimedia-image
- You can verify which image you are working with via the following command:
- The following Gstreamer pipeline will allow you to capture a single JPEG image:
gst-launch-1.0 qtiqmmfsrc camera=0 exposure-mode=0 manual-exposure-time=1333333 ! jpegenc snapshot=true ! identity error-after=2 ! filesink location=snap.jpg
- Note that this pipeline uses manual exposure. The value after
manual-exposure-time=is the exposure time in nanoseconds. - Note that
camera=is used to dictate which camera you are interacting with. 0 indicates the first camera installed (e.g. if CSI0 is left empty and you connect a camera to CSI1, you still usedcamera=0to read from the camera in CSI1).- CSI4 has a caveat that if it is the only CSI interface being used, you will still need to use
camera=1to interact with it. This is due to the fact that CSI3 and CSI4 share I2C lines and upon boot CSI3 is enumerated even if only CSI4 is being used. Note that ifcam-serveris restarted, CSI4 will becomecamera=0.
- Further details on the qtiqmmfsrc Qualcomm GStreamer plugin and what properties are supported can be found here
- Note that this pipeline uses manual exposure. The value after
Capturing Video
- Ensure the qcom-multimedia-image has been flashed onto the MitySOM-QC6490.
- You can verify which image you are working with via the following command:
root@qcs6490-mitysom-devkit:~# cat /etc/buildinfo | grep IMAGE_BASENAME
IMAGE_BASENAME = qcom-multimedia-image
- You can verify which image you are working with via the following command:
- The following Gstreamer pipeline will allow you to capture an MP4 encoded video:
gst-launch-1.0 -e qtiqmmfsrc name=camsrc camera=0 ! \
video/x-raw,format=NV12,width=1280,height=720,framerate=30/1,\
interlace-mode=progressive,colorimetry=bt601 ! v4l2h264enc \
capture-io-mode=4 output-io-mode=5 extra-controls="controls,video_bitrate=6000000,\
video_bitrate_mode=0;" ! h264parse ! mp4mux ! filesink location=mux_avc.mp4
- Once the video capture begins a timer will be displayed. Use
Ctrl Cto end video capture. - Upon ending capture an MP4 video named
mux_avc.mp4can be found in your current working directory.
- Once the video capture begins a timer will be displayed. Use
Using Multiple Cameras
If using SDK version 1.1 or newer, up to 5 cameras can be connected to the Development Board. ( Note that if using the 1.1 SDK, only 3 of the cameras can be streamed from simultaneously).
- Connect the desired number of cameras to the CSI ports. If it is required to use both CSI3 and CSI4 simultaneously, please reach out via the forums
- To use individual cameras, follow the same instructions as above but set the
camera=property in the command accordingly.
For example: To use the third camera connected (with the camera connected to the lowest index CSIx port being the first), change the command toqtiqmmfsrc name=camsrc camera=2 - To stream multiple cameras simultaneously, you can launch individual gstreamer pipelines in their own processes. You can also utilize the qtivcomposer plugin.
For example: To stream CSI0, CSI1, and CSI2 to a connected display simultaneously, use the following command and gstreamer pipeline:# First export the display with the following command: export XDG_RUNTIME_DIR=/dev/socket/weston && export WAYLAND_DISPLAY=wayland-1 gst-launch-1.0 -e qtivcomposer name=mixer sink_0::position="<0, 0>" sink_0::dimensions="<640, 360>" sink_1::position="<640, 0>" \ sink_1::dimensions="<640, 360>" sink_2::position="<0, 360>" sink_2::dimensions="<640, 360>" sink_3::position="<640, 360>" \ sink_3::dimensions="<640, 360>" mixer.src ! queue ! waylandsink enable-last-sample=false fullscreen=true sync=false async=true \ qtiqmmfsrc name=camsrc_0 camera=0 ! queue ! video/x-raw, format=NV12, width=640, height=360, framerate=30/1 ! queue ! mixer.sink_0 \ qtiqmmfsrc name=camsrc_1 camera=1 ! queue ! video/x-raw, format=NV12, width=640, height=360, framerate=30/1 ! queue ! mixer.sink_1 \ qtiqmmfsrc name=camsrc_2 camera=2 ! queue ! video/x-raw, format=NV12, width=640, height=360, framerate=30/1 ! queue ! mixer.sink_2
Troubleshooting
- Double check the camera module connection to the FPC connector at CSI0.
- Restart the camera server with the following command:
systemctl restart cam-server
- After restarting the cam-server, or rebooting, search the kernel log for a successful probe of the camera module by running the following command:
journalctl | grep -i "probe suc"
- If the sensor is properly connected and its I2C management interface is operational, the camera driver will successfully probe the camera module resulting in the following output:
qcs6490-mitysom-devkit kernel: CAM_INFO: CAM-SENSOR: cam_sensor_driver_cmd: 939: Probe success,slot:1,slave_addr:0xc0,sensor_id:0x9281, is always on: 0
- If the sensor is properly connected and its I2C management interface is operational, the camera driver will successfully probe the camera module resulting in the following output:
Go to top

