eMMC
The MitySOM-QC6490 Development Kit has an eMMC (U3) that can be used for additional storage when booting from UFS and (in the future) as a boot media itself.
Caveats
- Rev 1 and 2 of the MitySOM-QC6490 Development Kit does not have provisions to power the eMMC before the MitySOM-QC6490 is powered, which means eMMC cannot be used a boot media for these boards. Rev 3 of the MitySOM-QC6490 Development Kit will have this resolved.
- Rev 1 and 2 of the MitySOM-QC6490 Development Kit does not have a return clock connected on SDC1 interface, thus limiting the eMMC interface to HS200 speeds. Rev 3 of the MitySOM-QC6490 Development Kit has this resolved.
Development Board Configuration
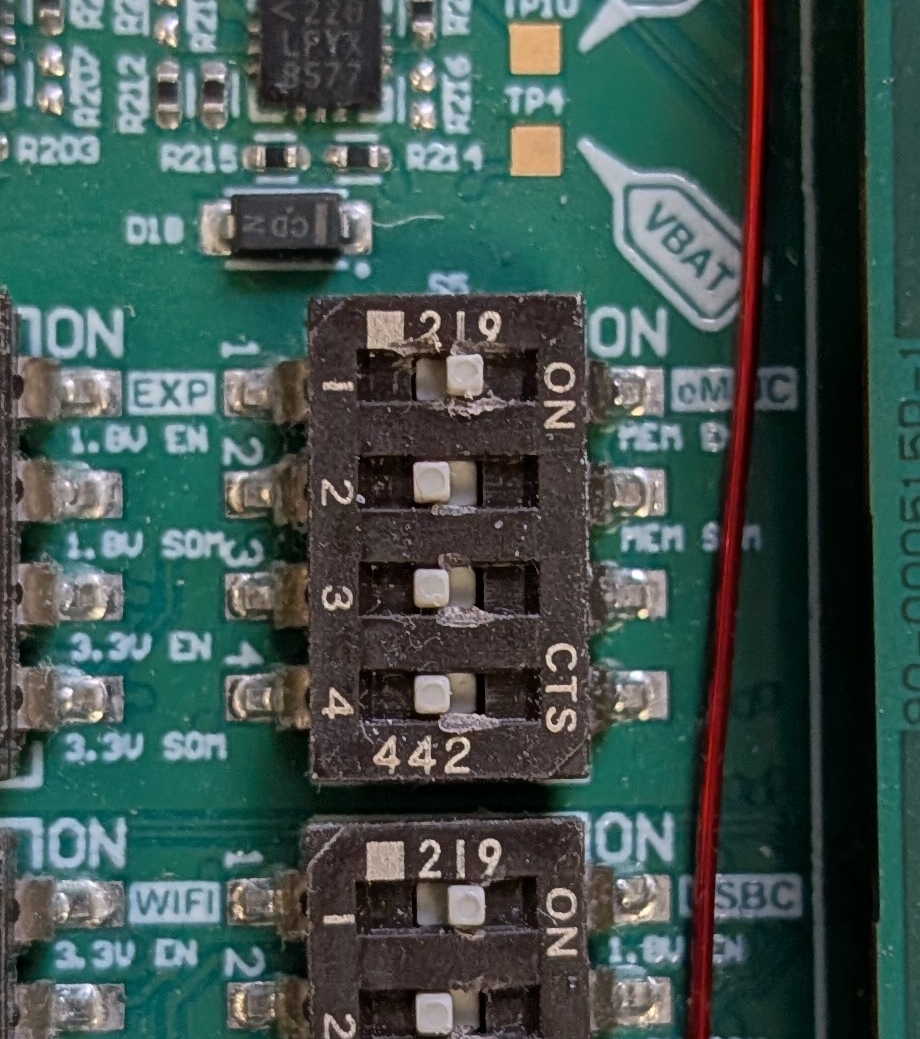
Ensure that Switch S5 is set properly.- Switch 1 should be set to enable MEM-EN, which is a top level enable to send 1.8 V to the eMMC
- Switch 2 can be either set or not set
- If Switch 2 is not set the 1.8V comes from the DC supply on the Development Kit
- If Switch 2 is set the 1.8V comes from the SOM
Usage as Additional Storage
Device Enumeration
eMMC will always appear as /dev/mmcblk0. You can use lsblk to verify the device is recognized:
root@qcs6490-mitysom-devkit:~# lsblk | grep mmcblk0
mmcblk0      179:0    0  58.3G  0 disk
mmcblk0boot0 179:32   0     4M  1 disk
mmcblk0boot1 179:64   0     4M  1 disk
Note that if you do not see mmcblk0, please verify the steps in Development Board Configuration were followed.
Partitioning, Formatting and Mounting
fdisk is recommended for partioning the eMMC.
- Run the command
fdisk /dev/mmcblk0. - Type
oand press enter. - Type
nand press enter. - Press enter.
- Press enter.
- Press enter.
- Press enter.
- The next step will commit all changes; ensure there was no remaining data on the eMMC card that you need.
- Type
wand press enter. A full transcript of the above partitioning steps should look something like the following:root@qcs6490-mitysom-devkit:~# fdisk /dev/mmcblk0 Welcome to fdisk (util-linux 2.39.3). Changes will remain in memory only, until you decide to write them. Be careful before using the write command. Command (m for help): o Created a new DOS (MBR) disklabel with disk identifier 0x22119e45. Command (m for help): n Partition type p primary (0 primary, 0 extended, 4 free) e extended (container for logical partitions) Select (default p): Using default response p. Partition number (1-4, default 1): First sector (2048-122314751, default 2048): Last sector, +/-sectors or +/-size{K,M,G,T,P} (2048-122314751, default 122314751): Created a new partition 1 of type 'Linux' and of size 58.3 GiB. Command (m for help): w The partition table has been altered. Calling ioctl() to re-read partition table. Syncing disks.
lsblk can be used to verify the partition was created.
root@qcs6490-mitysom-devkit:~# lsblk | grep mmcblk0
mmcblk0      179:0    0  58.3G  0 disk
`-mmcblk0p1  179:1    0  58.3G  0 part
mmcblk0boot0 179:32   0     4M  1 disk
mmcblk0boot1 179:64   0     4M  1 disk
Now you can make a file system on the eMMC partition you created.
We will move forward with an ext4 file system.
root@qcs6490-mitysom-devkit:~# mkfs.ext4 /dev/mmcblk0p1
mke2fs 1.47.0 (5-Feb-2023)
Discarding device blocks: done
Creating filesystem with 15289088 4k blocks and 3825664 inodes
Filesystem UUID: 149deef9-6556-48c6-9d1b-a158b6d0ccf8
Superblock backups stored on blocks:
        32768, 98304, 163840, 229376, 294912, 819200, 884736, 1605632, 2654208,
        4096000, 7962624, 11239424

Allocating group tables: done
Writing inode tables: done
Creating journal (65536 blocks): done
Writing superblocks and filesystem accounting information: done
You can now use the mount command to mount your partition:
root@qcs6490-mitysom-devkit:~# mount /dev/mmcblk0p1 /mnt
root@qcs6490-mitysom-devkit:~# ls -l /mnt
lrwxrwxrwx    1 root     root            16 Oct 21  2025 /mnt -> var/rootdirs/mnt
root@qcs6490-mitysom-devkit:~# df -h
Filesystem                Size      Used Available Use% Mounted on
/dev/mmcblk0p1           57.1G      2.0M     54.2G   0% /var/rootdirs/mnt
root@qcs6490-mitysom-devkit:~# mount | grep mmcblk0
/dev/mmcblk0p1 on /var/rootdirs/mnt type ext4 (rw,relatime)
Performance
If you want to benchmark the eMMC, fio is a highly flexible benchmarking utility that comes installed on the MitySOM-QC6490 Development Kit. You can read more at the link, but below is a basic fio commands (which assumes eMMC partition is mounted to /mnt) for testing read and write performance:
fio --name=emmc --filename=/mnt/emmctest --size=1G --bs=256k --iodepth=4 --numjobs=1 --ioengine=libaio --direct=1 --rw=write --loops=5 --verify=crc32c
Additional Information from debugfs
You can get additional information on eMMC via debugfs. First, mount debugfs.
mount -t debugfs none /sys/kernel/debug/
The mmc0/ios file supplies data on the interface speed. For eMMC operating at HS200 you should expect to see the following:
root@qcs6490-mitysom-devkit:~# cat /sys/kernel/debug/mmc0/ios
clock:          200000000 Hz
actual clock:   192000000 Hz
vdd:            18 (3.0 ~ 3.1 V)
bus mode:       2 (push-pull)
chip select:    0 (don't care)
power mode:     2 (on)
bus width:      3 (8 bits)
timing spec:    9 (mmc HS200)
signal voltage: 1 (1.80 V)
driver type:    0 (driver type B)
Usage as Boot Media
Caveats
- The following instructions require you have a MitySOM-QC rev4 or greater and MitySOM-QC Development Board rev4 or later.
- Critical Link BSP 1.2, and previous releases, do not support UFS as additional storage once booted from eMMC.
- Support for this is currently under investigation.
If you have any questions please post them on the forums.
Prepare the Hardware
- Set the
BOOTselect pins (S1) as seen below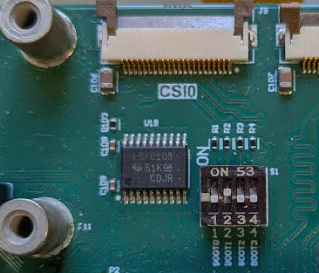
- Set the
eMMCpower selection (S5) as seen below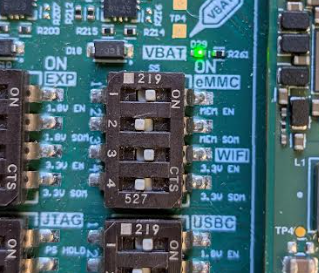
- Set the
DC EN SRCswitch (S15) as seen below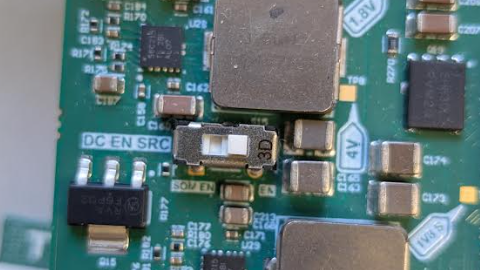
Prepare the Software Image
- Acquire a copy of the software image to program eMMC with (for example a pre-built qcom-multimedia-image from Repositories and Pre-built Images)).
- Note: This image will need to be modified so make a copy if preserving the original state is desired.
- Enter the image directory (e.g.
qcom-multimedia-image) and run the follow command:cp ./partition_emmc/gpt_main*.bin ./partition_emmc/gpt_backup*.bin ./partition_emmc/rawprogram[0-9].xml ./partition_emmc/patch*.xml ./partition_emmc/zeros_*sectors.bin ./
Program the CDT
- Make and enter a
cdt_emmcdirectorymkdir cdt_emmc
cd cdt_emmc
- Copy files from the BSP cdt directory:
cp {bsp_directory}/cdt/mitysom-qc6490-devkit_CDT.bin .cp {bsp_directory}/cdt/prog_firehose_ddr.elf .
- Copy files from the qcom-multimedia-image directory:
cp {qcom-multimedia-image_dir}/partition_emmc/gpt_*1* .cp {qcom-multimedia-image_dir}/rawprogram1.xml .cp {qcom-multimedia-image_dir}/patch1.xml .
- Modify the copied ‘rawprogram1.xml’ with a text editor of choice to point at the CDT binary:
-- <program start_sector="34" size_in_KB="4.0" physical_partition_number="1" partofsingleimage="false" file_sector_offset="0" num_partition_sectors="8" readbackverify="false" filename="" sparse="false" start_byte_hex="0x4400" SECTOR_SIZE_IN_BYTES="512" label="cdt"/>
++ <program start_sector="34" size_in_KB="4.0" physical_partition_number="1" partofsingleimage="false" file_sector_offset="0" num_partition_sectors="8" readbackverify="false" filename="mitysom-qc6490-devkit_CDT.bin" sparse="false" start_byte_hex="0x4400" SECTOR_SIZE_IN_BYTES="512" label="cdt"/>
- Program the ‘cdt’ with QDL:
- Use
lsusbto verify the system is in QDL mode. {path_to_qdl}/qdl --storage emmc prog_firehose_ddr.elf rawprogram1.xml patch1.xml- Successful programming should look similar to the following:
waiting for programmer...
flashed "cdt" successfully
flashed "PrimaryGPT" successfully
flashed "BackupGPT" successfully
13 patches applied
no boot partition found
- Use
Program Filesystem, etc.
- Change directory back into the qcom-multimedia-image directory and program with QDL:
- Use
lsusbto verify the system is in QDL mode. {path_to_qdl}/qdl --storage emmc prog_firehose_ddr.elf rawprogram0.xml patch0.xml- Successful programming should look similar to the following:
waiting for programmer...
flashed "xbl_a" successfully
flashed "xbl_b" successfully
flashed "dtb_a" successfully at 65536kB/s
flashed "dtb_b" successfully at 32768kB/s
flashed "efi" successfully at 40329kB/s
flashed "xbl_config_a" successfully
flashed "xbl_config_b" successfully
flashed "xbl_ramdump_a" successfully
flashed "uefi_a" successfully
flashed "shrm_a" successfully
flashed "tz_a" successfully
flashed "tz_b" successfully
flashed "aop_a" successfully
flashed "aop_b" successfully
flashed "hyp_a" successfully
flashed "hyp_b" successfully
flashed "imagefv_a" successfully
flashed "imagefv_b" successfully
flashed "uefisecapp_a" successfully
flashed "uefisecapp_b" successfully
flashed "multiimgoem_a" successfully
flashed "cpucp_a" successfully
flashed "devcfg_a" successfully
flashed "devcfg_b" successfully
flashed "qupfw_a" successfully
flashed "qupfw_b" successfully
flashed "toolsfv" successfully
flashed "system" successfully at 41339kB/s
flashed "PrimaryGPT" successfully
flashed "BackupGPT" successfully
13 patches applied
partition 0 is now bootable
- Use
- Boot the SOM, but note that this boot will take longer than normal as you will need to wait for some timeouts (~2 minutes).
- Make modification to prevent the timeouts from occurring in the future:
- Login
mount -o remount, rw /usr
rm /usr/lib/systemd/system/local-fs.target.wants/var-usbfw.mount
rm /usr/lib/systemd/system/var-usbfw.mount
- Reboot
- Login and verify you are booted from eMMC.
df -h | grep -w "/"
- You should see root is mounted to mmcblk0p67:
/dev/mmcblk0p67 36.7G 3.9G 31.1G 11% /
References