- Table of contents
- Building an SD Card Image
Building an SD Card Image
The SD card from Critical Link are setup with the following structure: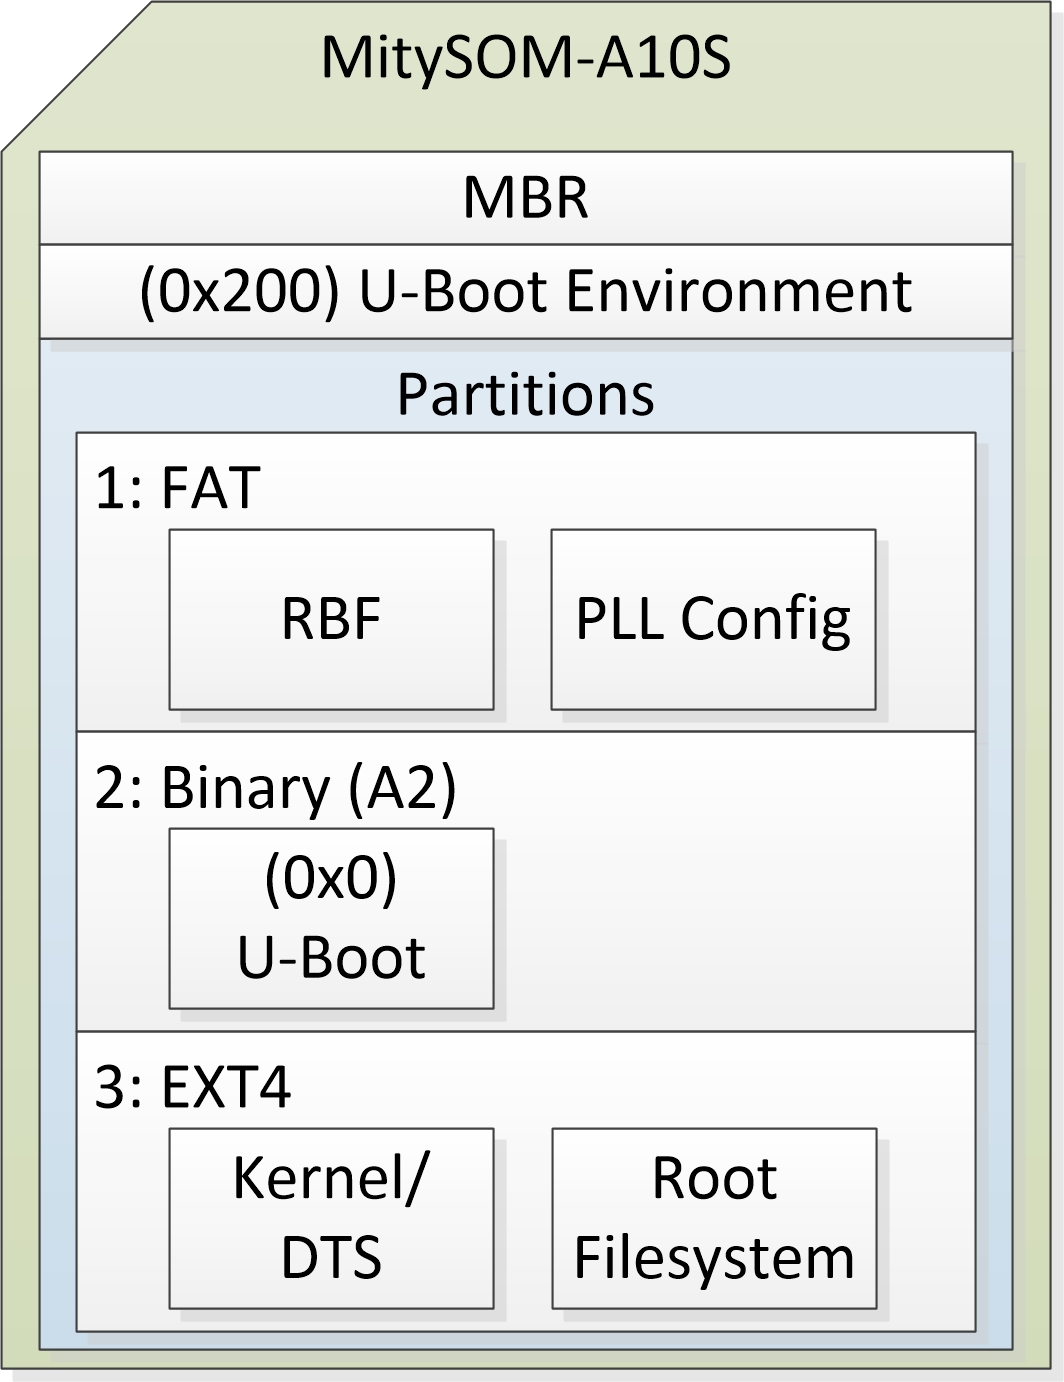
The following steps will create the SD card binary image. The script will need to be run on a linux computer, such as ubuntu 16.04 or 18.04.
The SD card image generation script can also be obtained from the meta-cl-socfpga layer (git://support.criticallink.com/home/git/meta-cl-socfpga.git under recipes-bsp/sd-card-scripts/files/make_sd.sh).
The following is needed in the same directory:- mitysom_a10s.core.rbf Core FPGA image
- mitysom_a10s.periph.rbf Peripheral FPGA image
- mitysom-image-base-mitysom-a10s.tar.gz Yocto root filesystem with kernel and device tree
- uboot_w_dtb-mkpimage.bin U-Boot
- ubootenv.bin U-Boot Environment
Prerequisite
The following needs to be installed before the script can be run
sudo apt-get install --no-install-recommends -y  libguestfs-tools qemu-utils linux-image-generic
sudo chmod o+r,g+r /boot/vmlinuz-*
Building the SD card image
- Build the SD card Image
./make_sd.sh -d Arria10 -f mitysom_a10s.core.rbf -f mitysom_a10s.periph.rbf -u uboot_w_dtb-mkpimage.bin -e ubootenv.bin mitysom-image-base-mitysom-a10s.tar.gz
- The SD card image will be called: sd_card.img
Updating the full SD Card
Note that you need to confirm that you are writing to your SD card and not another drive on your system. You can confirm this with either viewing the "df" command output or using the "Disk Utility" GUI and confirming your SD card (reader) device (I.E. /dev/sdd). You can view your drive partitions in Linux using the "sudo fdisk -l" command.
Replace the 'X' shown in the command below with your drive letter:
sudo dd if=sd_card.img of=/dev/sdX status=progress
Updating parts of the SD card
It is possible to then update the individual parts of the SD card. The instructions given will be for using a linux host machine.
Updating the Bootloader (u-boot)
u-boot is stored in the 2nd partition, which does not have a file system. In order to write u-boot you will need to write it raw to the partition using the dd command.
Note that you need to confirm that you are writing to your SD card and not another drive on your system. You can confirm this with either viewing the "df" command output or using the "Disk Utility" GUI and confirming your SD card (reader) device (I.E. /dev/sdd). You can view your drive partitions in Linux using the "sudo fdisk -l" command.
Replace the 'X' shown in the command below with your drive letter:
sudo dd if=uboot_w_dtb-mkpimage.bin of=/dev/sdX2 bs=64k
Updating u-boot Environment
u-boot is stored right after the MBR on the SD card and not on a partition. In order to write u-boot you will need to write it raw to the partition using the dd command.
Note that you need to confirm that you are writing to your SD card and not another drive on your system. You can confirm this with either viewing the "df" command output or using the "Disk Utility" GUI and confirming your SD card (reader) device (I.E. /dev/sdd). You can view your drive partitions in Linux using the "sudo fdisk -l" command.
Replace the 'X' shown in the command below with your drive letter:
sudo dd if=ubootenv.bin of=/dev/sdX bs=512 seek=1
Updating the FPGA Images
The Critical Link provided FPGA project is setup to split the FPGA image into two pieces: HPS peripheral image and core FPGA image. These are stored on the first partition, which is formatted in the windows FAT format. This means that they can easily be updated from a windows machine or a linux machine. Just copy the 2 RBFs from the build output onto the first partition. Note For the provided project u-boot is expected both to be called mitysom_a10s.periph.rbf and mitysom_a10s.core.rbf.
Updating the Root Filesystem, Kernel, and Device Tree
The Critical Link provided linux root filesystem is stored on the 3rd partition, which is formatted EXT4. This partition can easily be updated from a linux host.
To update the kernel
Note that you need to confirm that you are writing to your SD card and not another drive on your system. You can confirm this with either viewing the "df" command output or using the "Disk Utility" GUI and confirming your SD card (reader) device (I.E. /dev/sdd). You can view your drive partitions in Linux using the "sudo fdisk -l" command.
Replace the 'X' shown in the command below with your drive letter:
sudo mount /sdX3 /mnt
sudo cp zImage /mnt/boot
sudo umount /mnt
To update the Device Tree
Note that you need to confirm that you are writing to your SD card and not another drive on your system. You can confirm this with either viewing the "df" command output or using the "Disk Utility" GUI and confirming your SD card (reader) device (I.E. /dev/sdd). You can view your drive partitions in Linux using the "sudo fdisk -l" command.
Replace the 'X' shown in the command below with your drive letter:
sudo mount /sdX3 /mnt
sudo cp mitysom_a10s_devkit.dtb /mnt/boot
sudo umount /mnt