Building the SD Card under Quartus PRO 21.3
1. Prerequisites 2. Building the FPGA Image 3. Building the Bootloader 4. Building the Filesystem 5. Building the SD Card
- Table of contents
- Building the SD Card under Quartus PRO 21.3
Introduction
Building the SD Card from the Quartus Project Makefile
Prerequisites
- Linux (tested on Ubuntu 18.04)
- libguestfs-tools insteall
sudo apt-get install libguestfs-tools
- vmlinux set a readable (note: this needs to be done every time the kernel is upgraded)
sudo chmod a+r /boot/vmlinuz*
Steps
- Copy the filesystem tarball built from yocto (mitysom-image-base-mitysom-a10s.tar.gz) to the software folder in the reference FPGA project
- Enter the following command that will allow you to use the Quartus tools from the command line. Note that the NIOS2 is not required in the design, this is just a convenience script to update your shell path.
/opt/intelFPGA_pro/21.3/nios2eds/nios2_command_shell.sh
- Run the following command to build the SD card image
make sd_image
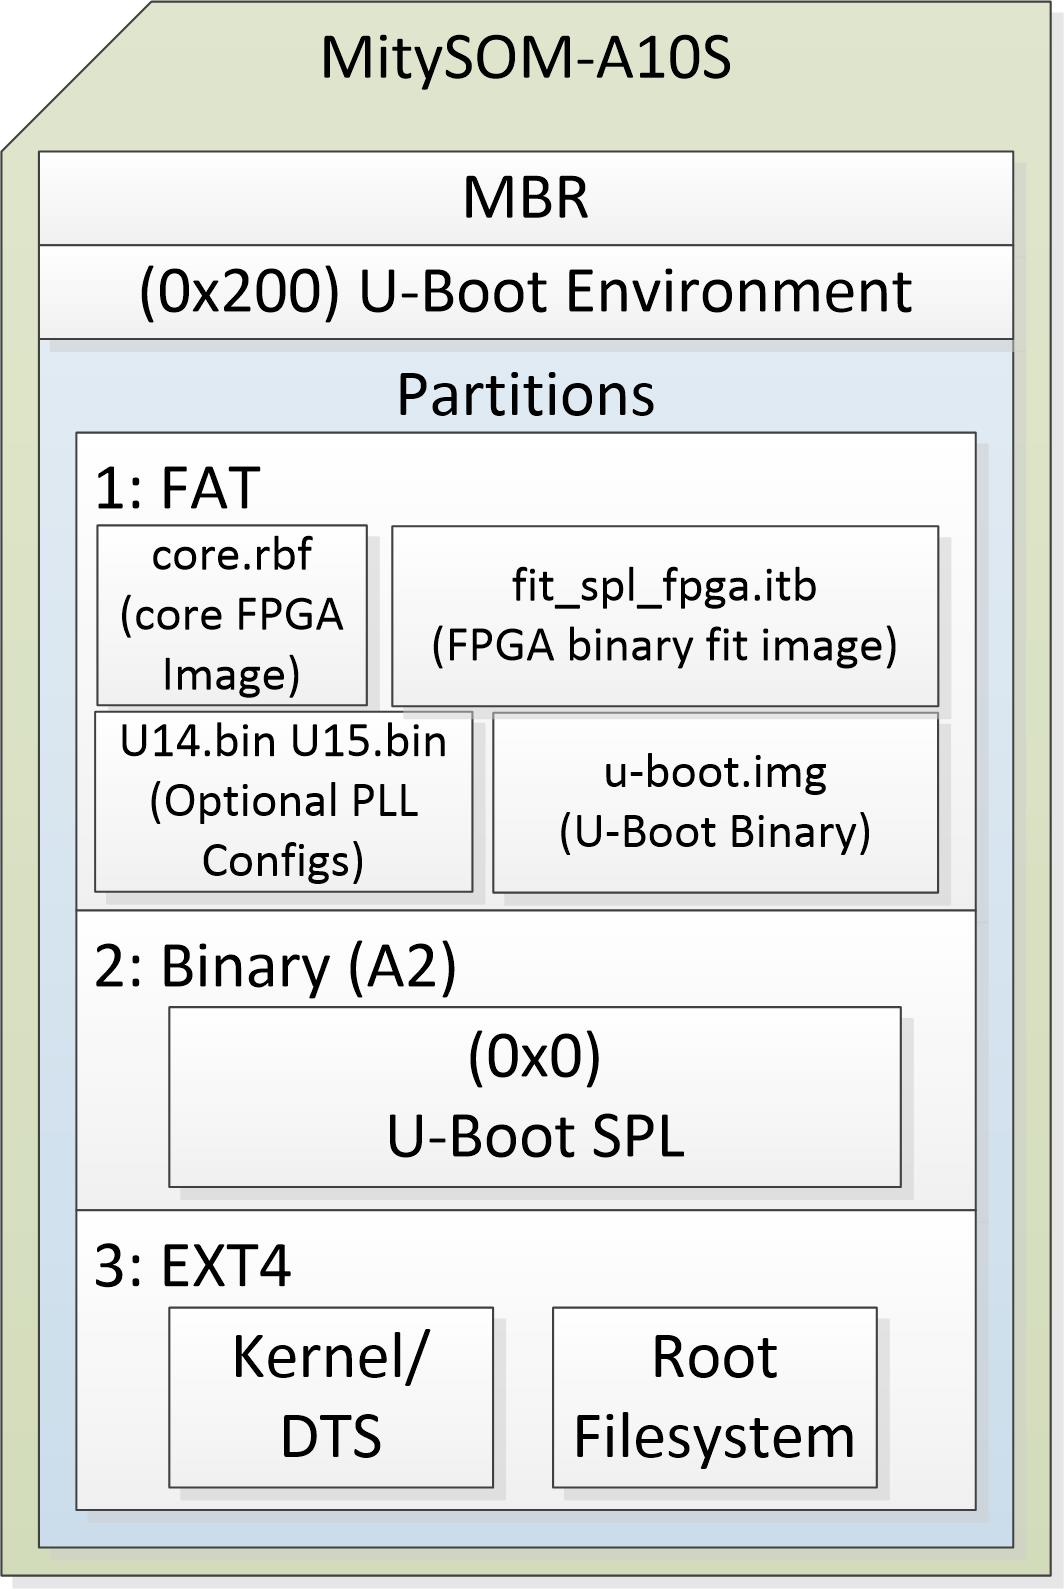
Outputs
| Description | Location |
| SD Card Binary | <Quartus Project Folder>/sd_card.img |
ADVANCED: Updating Individual Parts
Updating the u-Boot SPL
If you make changes to the HPS pin multiplexing options to your project, you will need to rebuild and update the SPL image and the FPGA fit_spl_fpga.itb file (contains the peripheral RBF image). Critical link recommends updating the u-Boot SPL and u-Boot TPL (below) and FPGA files at the same time.
To update the FPGA RBF images, see Updating the FPGA Image
Installing From Linux On the MitySOM_A10S via ethernet
- scp the SPL image to the /tmp folder
scp software/bootloader/u-boot-socfpga/spl/u-boot-splx4.sfp root@your.boards.ip.addr:/tmp
- flash the image onto the SD partition
dd if=/tmp/u-boot-splx4.sfp of=/dev/mmcblk0p2 bs=512 && sync
Installing From a Linux Host using an SD-Card reader
Please note the X in the following example of /dev/sdX is a placeholder, you will need to find out what your machine enumerates your sd card's second partition as and replace the X with it.
- Plug in the SD Card reader
- Make sure it isn't mounted
sudo umount /dev/sdX
- Write the new u-boot environment over the old
dd if=software/bootloader/u-boot-socgpa/spl/u-boot-splx4.sfp of=/dev/sdX bs=512 && sync
Updating U-Boot TPL
Installing From Linux On the MitySOM_A10S via ethernet
- On the MitySOM-A10S, mount the FAT partition
mount /dev/mmcblk0p1 /mnt
- On the host, copy the FPGA files to the MitySOM-A10S using a windows command line or linux command line and SCP
scp software/bootloader/u-boot-socgpa/u-boot.img root@your.boards.ip.addr:/mnt
Installing From a Linux or Windows Host using an SD-Card reader
Simply copy the software/bootlaoder/u-boot-socgpa/u-boot.img file onto the FAT partition that appears when teh card is inserted into the reader.
Updating U-Boot Environment
Installing From Linux On the MitySOM_A10S via ethernet
- On the host, scp the SPL image to the /tmp folder
scp software/bootloader/u-boot-socfpga/ubootenv.bin root@your.boards.ip.addr:/tmp
- On the MitySOM-A10S, flash the image at 512 bytes off the base position of the card
dd if=/tmp/ubootenv.bin of=/dev/mmcblk0 bs=512 seek=1 && sync
Installing From a Linux Host using an SD-Card reader
Please note the X in the following example of /dev/sdX is a placeholder, you will need to find out what your machine enumerates your sd card.
- Plug in the SD Card reader
- Make sure it isn't mounted
sudo umount /dev/sdX
- Write the new u-boot environment over the old
dd if=software/bootloader/u-boot-socgpa/ubootenv.bin of=/dev/sdX bs=512 seek=1 && sync
Updating the FPGA image
Copy the software/bootloader/u-boot-socfpga/fit_spl_fpgfa.itb (contains the peripheral RBF) and core RBF to the 1st partition, which is formatted as FAT. Please note they need to have the same name as the originals for u-boot to find them.
Using the booted Arria10 to update the files
- On the MitySOM-A10S, mount the FAT partition
mount /dev/mmcblk0p1 /mnt
- scp the FPGA files to the partition using a windows command line or linux command line and SCP
scp software/bootloader/fit_spl_fpga.itb root@your.boards.ip.addr:/mnt
scp software/bootloader/*.core.rbf root@your.boards.ip.addr:/mnt
Using an SD card reader on Windows or Linux
- install the card
- copy the files onto the FAT partition (only one available on Windows)
1. Prerequisites 2. Building the FPGA Image 3. Building the Bootloader 4. Building the Filesystem 5. Building the SD Card
Go to top

