1 Gb Ethernet
Objective
This example connects and verifies the 1 Gb Ethernet interface supplied on the Development Kit. The default configuration makes use of DHCP. Information on how to set a Static address is also provided.
Prerequisites
- An ethernet cable, a switch.
Steps if a DHCP Server is present
- If the network you are connecting to does not have a DHCP server, proceed to the next section
- Have the Development kit powered up and have a terminal emulator attached to the USB-uart serial port.
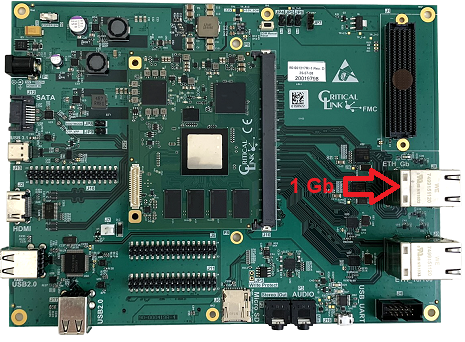
- Plug the ethernet cable into one of the two ethernet ports for Gb ethernet. Either of the top or bottom links should be fine.
- Verify that an IP address has been assigned.
root@mitysom-am57x:~# ip address
1: lo: <LOOPBACK,UP,LOWER_UP> mtu 65536 qdisc noqueue state UNKNOWN group default qlen 1000
    link/loopback 00:00:00:00:00:00 brd 00:00:00:00:00:00
    inet 127.0.0.1/8 scope host lo
       valid_lft forever preferred_lft forever
    inet6 ::1/128 scope host
       valid_lft forever preferred_lft forever
2: eth0: <NO-CARRIER,BROADCAST,MULTICAST,UP> mtu 1500 qdisc mq state DOWN group default qlen 1000
    link/ether f8:33:31:76:76:74 brd ff:ff:ff:ff:ff:ff
3: eth1: <BROADCAST,MULTICAST,UP,LOWER_UP> mtu 1500 qdisc mq state UP group default qlen 1000
    link/ether f8:33:31:76:76:75 brd ff:ff:ff:ff:ff:ff
    inet 10.0.103.50/16 brd 10.0.255.255 scope global dynamic eth1
       valid_lft 5316sec preferred_lft 5316sec
    inet6 fe80::fa33:31ff:fe76:7675/64 scope link
       valid_lft forever preferred_lft forever
4: sit0@NONE: <NOARP> mtu 1480 qdisc noop state DOWN group default qlen 1000
    link/sit 0.0.0.0 brd 0.0.0.0
5: eth2: <NO-CARRIER,BROADCAST,MULTICAST,UP> mtu 1500 qdisc fq_codel state DOWN group default qlen 1000
    link/ether f2:cf:ee:e0:88:08 brd ff:ff:ff:ff:ff:ff
6: eth3: <NO-CARRIER,BROADCAST,MULTICAST,UP> mtu 1500 qdisc fq_codel state DOWN group default qlen 1000
    link/ether ea:0f:47:47:d1:4c brd ff:ff:ff:ff:ff:ff
root@mitysom-am57x:~#
- Verify that the link is working.
- If connected to the internet, use ping to contact the ethernet address 8.8.8.8. (google DNS server)
root@mitysom-am57x:~# ping 8.8.8.8
PING 8.8.8.8 (8.8.8.8): 56 data bytes
64 bytes from 8.8.8.8: seq=0 ttl=60 time=15.061 ms
64 bytes from 8.8.8.8: seq=1 ttl=60 time=15.033 ms
64 bytes from 8.8.8.8: seq=2 ttl=60 time=14.936 ms
^C
--- 8.8.8.8 ping statistics ---
3 packets transmitted, 3 packets received, 0% packet loss
round-trip min/avg/max = 14.936/15.010/15.061 ms
root@mitysom-am57x:~#
- If not connected to the internet, use ping to contact one of your internal ethernet addresses. Please note that some Windows PCs are not configured to respond to ping requests by default as a security measure. (e.g. Windows 10 and 11)
- If connected to the internet, use ping to contact the ethernet address 8.8.8.8. (google DNS server)
Steps using a Static IP address
- Follow the steps described in N_Setting Static IP Address
- Use ping as described in the DHCP section.
- You will probably need to make sure the gateway is configured to ping something external to your local network.
Conclusion
In this example you have verified that the 1Gb ethernet ports are working by letting DHCP assign an IP address or by assigning your own static IP address and then using ping to communicate with another system.
Go to top

