QT Starter Guide 2022
- Table of contents
- QT Starter Guide 2022
This guide will step you through setting up and running a simple Qt Gui Application on your MitySOM-57x system.
Prerequisites
Dev PC
- Make sure you have a VM installed or are running Linux natively.
Note it may also be possible to do this from Windows WSL though we have not tested it.- We currently recommend Desktop Ubuntu LTS 20.04 64bit, as it has most of the requisite programs.
- Note the arago-2019.11 toolchain does not work on ubuntu 22.04+, due to a libstdc++.so.6 incompatibility
- arago-2019.11-armv7a-linux-gnueabi-tisdk.sh file. https://support.criticallink.com/redmine/projects/mitysom_am57x/wiki/Repositories_and_Pre-built_Images
Devkit
- Devkit using the 20220323 tisdk-rootfs-image image
Or similar if you've built it yourself
Setup SDK
- Open a terminal and make the file executable
chmod +x arago-2019.11-armv7a-linux-gnueabi-tisdk-2022-04-20.sh
- Install the SDK
./arago-2019.11-armv7a-linux-gnueabi-tisdk-2022-04-20.sh
Enter target directory for SDK (default: /usr/local/arago-2019.11):
You are about to install the SDK to "/usr/local/arago-2019.11". Proceed[Y/n]?
Extracting SDK...done
Setting it up...done
SDK has been successfully set up and is ready to be used.
Setup CMake
- Install CMake
sudo apt-get install cmake
Setup QtCreator
- Install QtCreator
sudo apt install qtcreator
- Install the necessary libraries and compilers
sudo apt install build-essential
- Finally, install Qt5
sudo apt install qtbase5-dev qt5-qmake qtbase5-dev-tools
Note: Its worth knowing that this version of QT5 is for building your application on your PC as it is often easier and quicker to build and test GUIs on your PC before trying to build them for your devkit.
Note: The QT5 version installed will be different than the one used on the devkit, this will usually be fine but you may occasionally run into slight changes in functions or bugs between versions. If you want to use the exact same version on the PC as on the devkit you'll need to manually install it from QT's website.
Once this is done, QtCreator can be started through the Ubuntu UI.
Setting Up the Kit
- Open Qt Creator
- Open terminal and source toolchain. Then launch qtcreator. This is to avoid the "Qt Version not properly installed" error.
$ source /usr/local/arago-2019.11/environment-setup
$ qtcreator
- Open terminal and source toolchain. Then launch qtcreator. This is to avoid the "Qt Version not properly installed" error.
apt from the default Ubuntu repositories. If you are using a different version of Qt Creator, some of the settings or configurations screens may be different. Please contact Critical Link if you have difficulties applying these instructions to your version of Qt Creator.
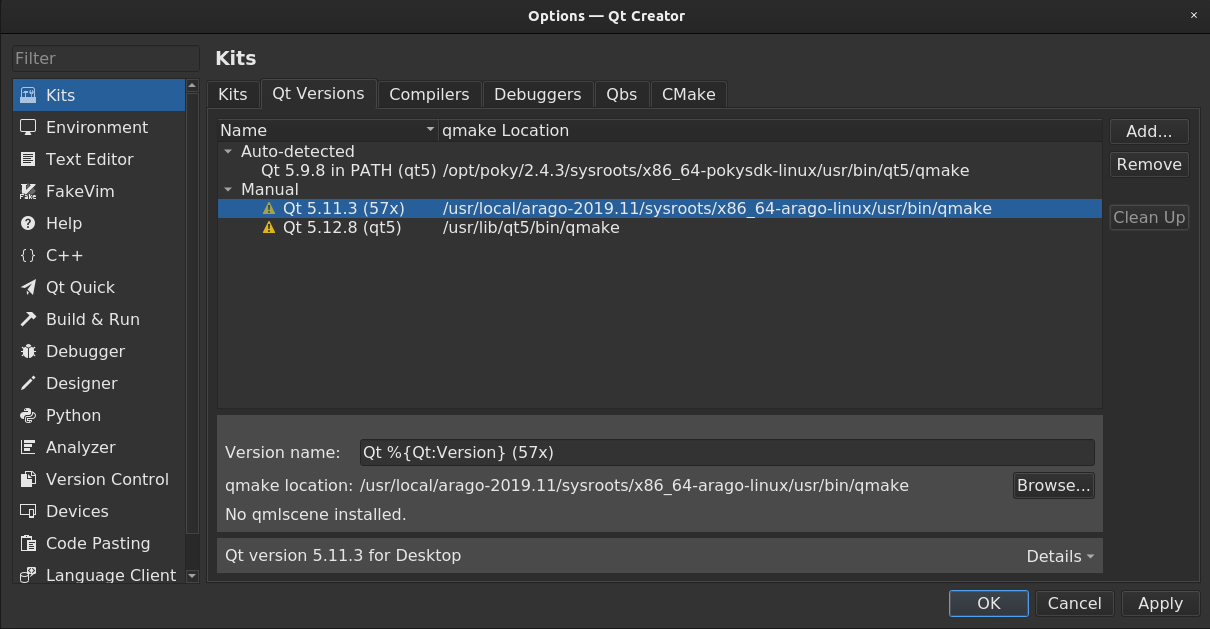
- Go to the Tools -> Options... menu and select "Kits" from the left options
- Select the "Qt Versions" tab that is shown. Click the "Add..." button. Navigate to <SDK path>/sysroots/x86_64-arago-linux/usr/bin/ and click on qmake. Change Name to "Qt %{Qt:Version} (57x)"
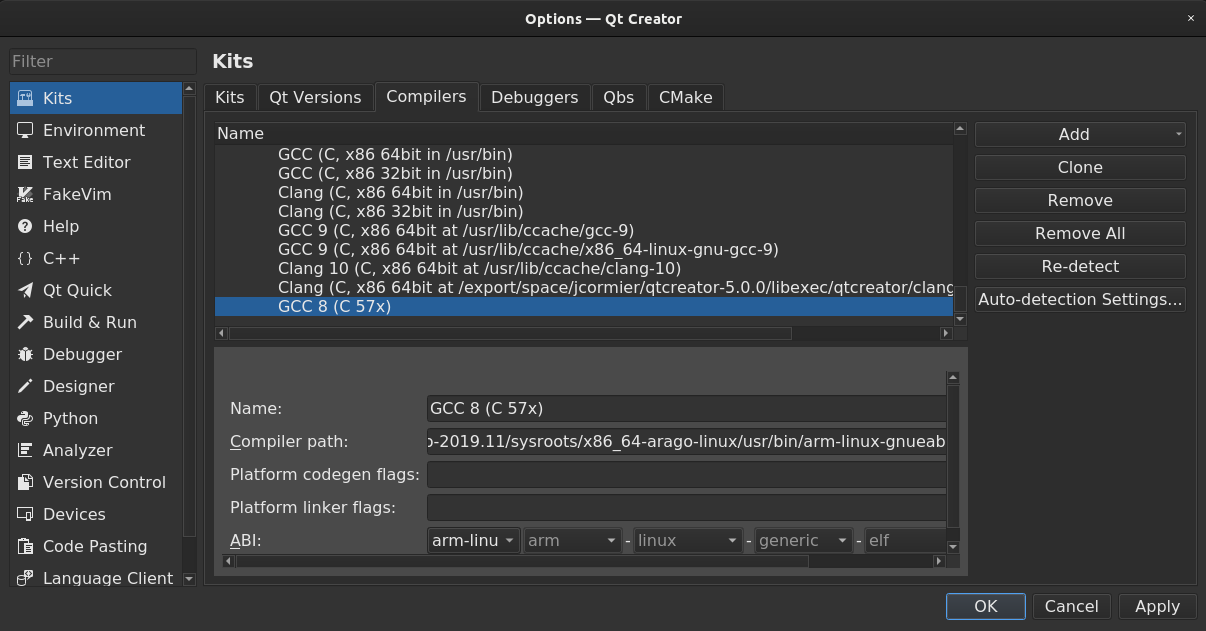
- Select the Compilers tab. Click on Add -> GCC -> C. Navigate to <SDK path>/sysroots/x86_64-arago-linux/usr/bin/ and select arm-linux-gnueabi-gcc. Change name to "GCC (C 57x)"
- Click Add again, but this time select GCC -> C++. Navigate to <SDK path>/sysroots/x86_64-arago-linux/usr/bin/ and select arm-linux-gnueabi-g++. Change name to "GCC (C++ 57x)"
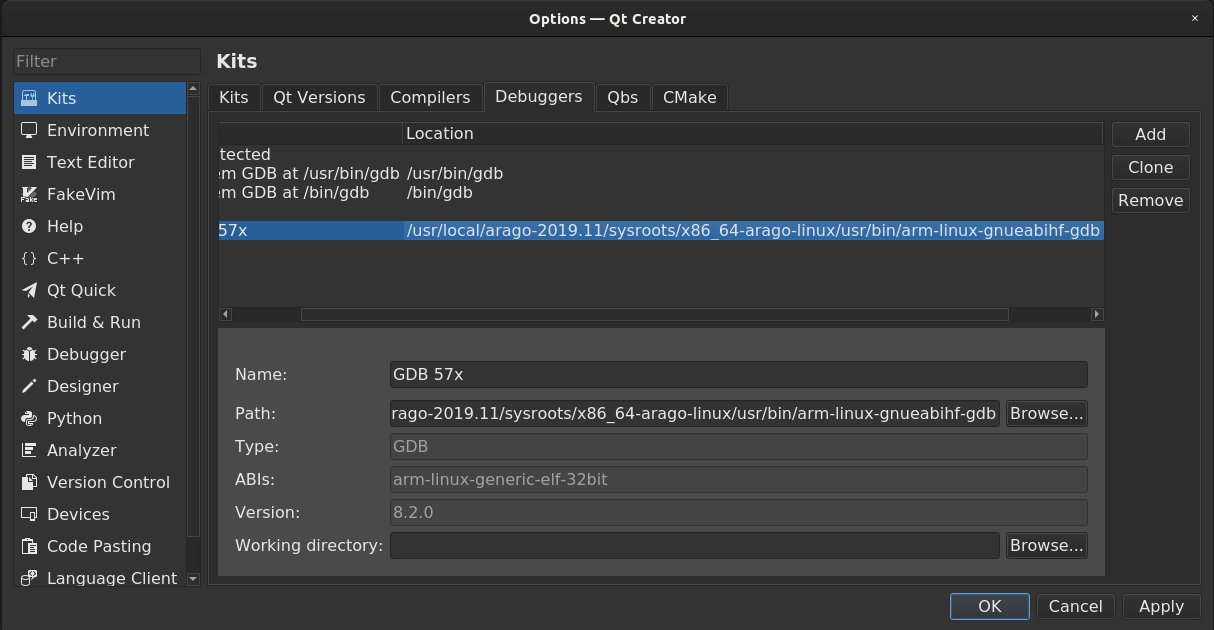
- Select the Debuggers tab. Click on Add and give the new debugger an easily recognizable name. Click on browse next to path and navigate to <SDK path>/sysroots/x86_64-arago-linux/usr/bin/ and select arm-linux-gnueabi-gdb. Change name to "GDB 57x"
- Select the CMake tab. Confirm that CMake is under Auto-detected. If it is not, click Add and then click newly-created NewCMake under Manual. Change the name to CMake and the path to /usr/bin/cmake.
- Select Devices from the left options. Under the Devices tab, click on Add... and select Generic Linux Device. Choose a name, and enter the IP address of the devkit and root as the username, leaving password blank. If the test fails, you will not be able to deploy into the devkit from QtCreate.
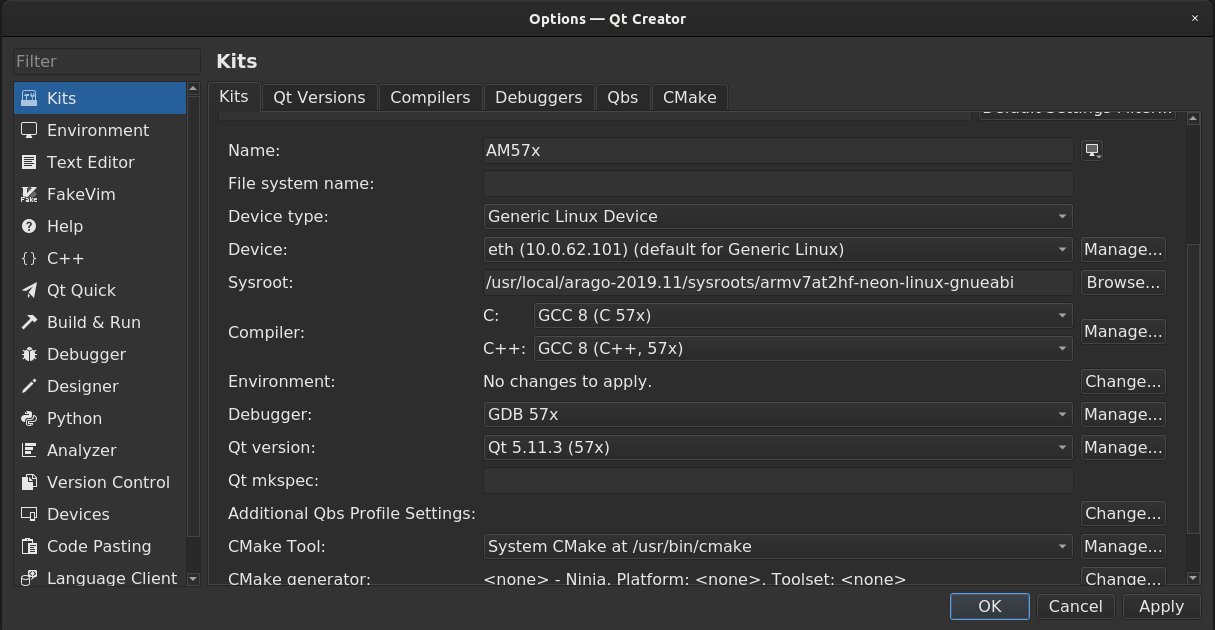
- Return to Kits in the left options and navigate to the Kits tab. Click on Add and fill in the options with the components from previous steps. For Sysroot, navigate to and select <SDK path>/sysroots/armv7at2hf-neon-linux-gnueabi
- Click OK to return to the Welcome page.
Building and Compiling the GUI
- In the Welcome page click on new project.
- Choose Qt Widgets Application and click Next
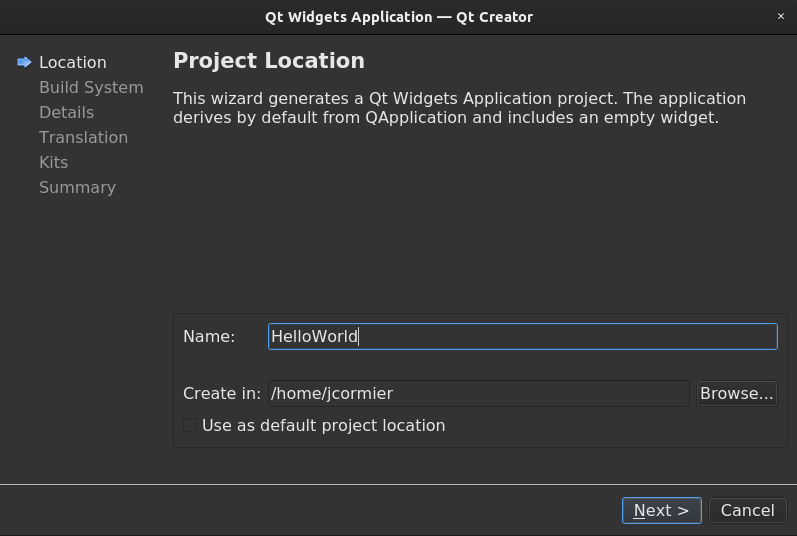
- Give the project a name "HelloWorld" and press browse next to Create in, to create a new folder "projects"
- In Kit selection, select the kit created the previous steps. Keep desktop selected so you can run and test the program on the PC.
- Continue to click next and then finish.
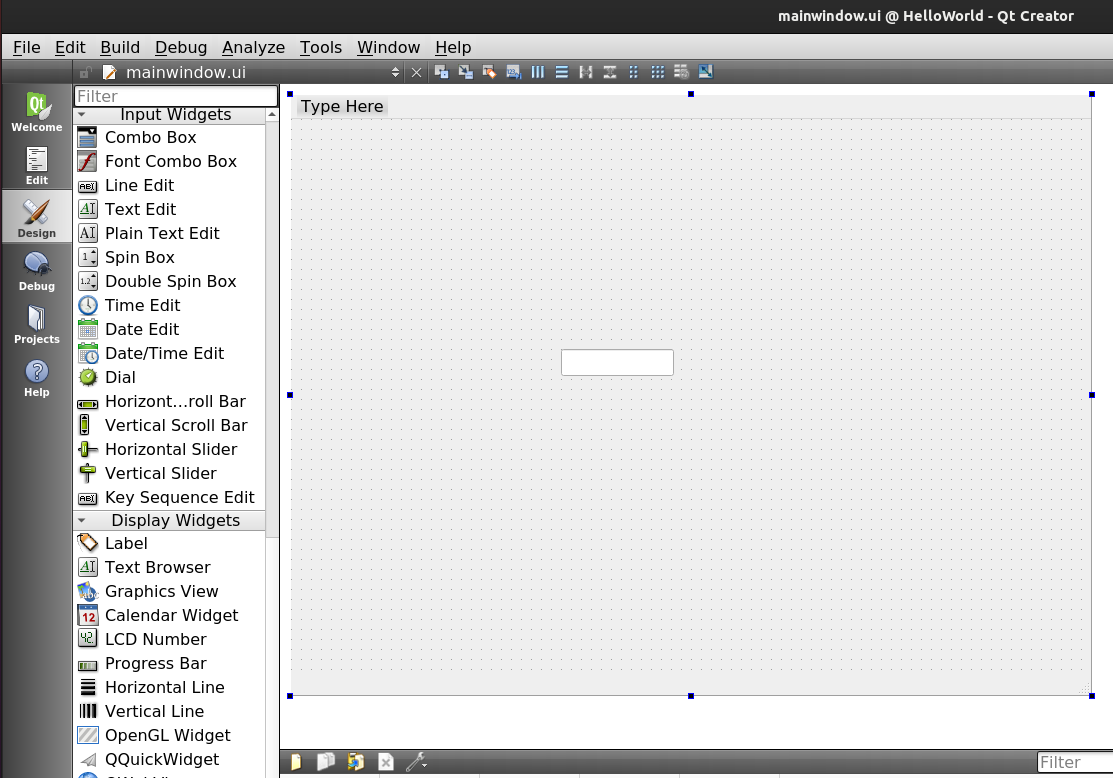
- Expand the project source tree and inside 'Forms' double-click on 'mainwindow.ui. This will open the Design view.
- Drag and drop a 'Line Edit' Input Widget from the left hand pane onto the central pane.
- Click on the 'Edit' in the left hand column of Qt Creator.
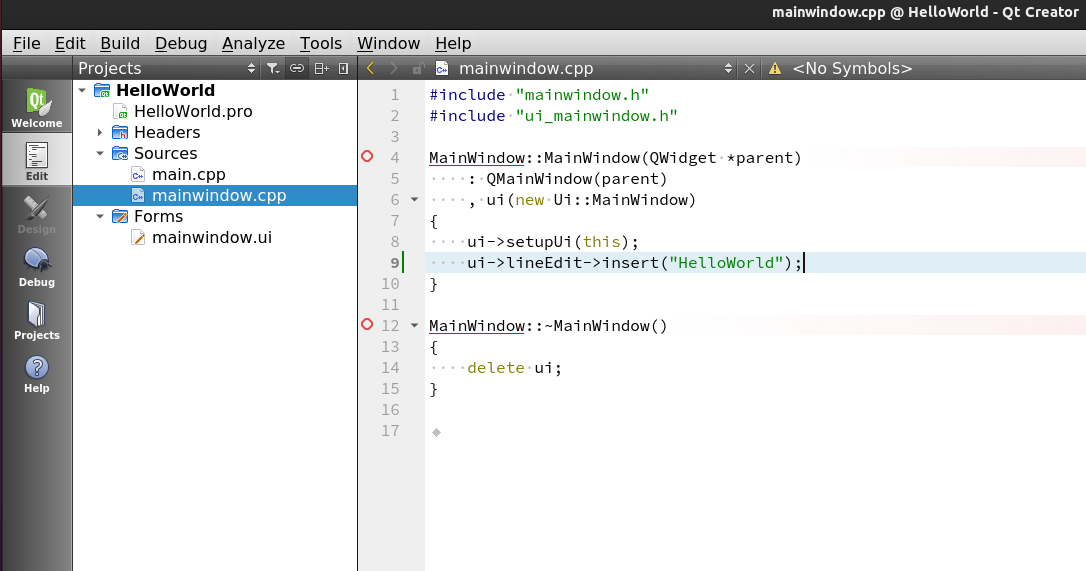
- In the project source tree, double-click on 'mainwindow.cpp' in the 'Sources' directory.
- Add 'ui->lineEdit->insert("Hello World!");' to the MainWindow class constructor.
- Click the wrench in the bottom left corner to build the project. (ctrl-b)
Note: To change build configs, you can select the PC icon in the bottom left and change between Kits and also change between building for Debug and Release.
Running the GUI on the MitySOM-57x from QtCreator
- While on the project, click the Edit button on the left
- add the following lines to HelloWorld.pro
TARGET = HelloWorld
target.files = HelloWorld
target.path = /home/root
INSTALLS += target
Launching GUI without weston/wayland
If you want to launch the application without weston/wayland display manager, qt applications can talk directly with the GPU or framebuffer
- Prevent weston and matrix-gui from starting at boot
root@mitysom-am57x:~# systemctl disable weston matrix-gui-2.0
weston.service is not a native service, redirecting to systemd-sysv-install.
Executing: /lib/systemd/systemd-sysv-install disable weston
update-rc.d: /etc/init.d/weston exists during rc.d purge (continuing)
 Removing any system startup links for weston ...
  /etc/rc0.d/K20weston
  /etc/rc1.d/K20weston
  /etc/rc2.d/S09weston
  /etc/rc5.d/S09weston
  /etc/rc6.d/K20weston
Synchronizing state of matrix-gui-2.0.service with SysV service script with /lib/systemd/systemd-sysv-install.
Executing: /lib/systemd/systemd-sysv-install disable matrix-gui-2.0
update-rc.d: /etc/init.d/matrix-gui-2.0 exists during rc.d purge (continuing)
 Removing any system startup links for matrix-gui-2.0 ...
Removed /etc/systemd/system/multi-user.target.wants/matrix-gui-2.0.service.
root@mitysom-am57x:~# systemctl stop weston matrix-gui-2.0
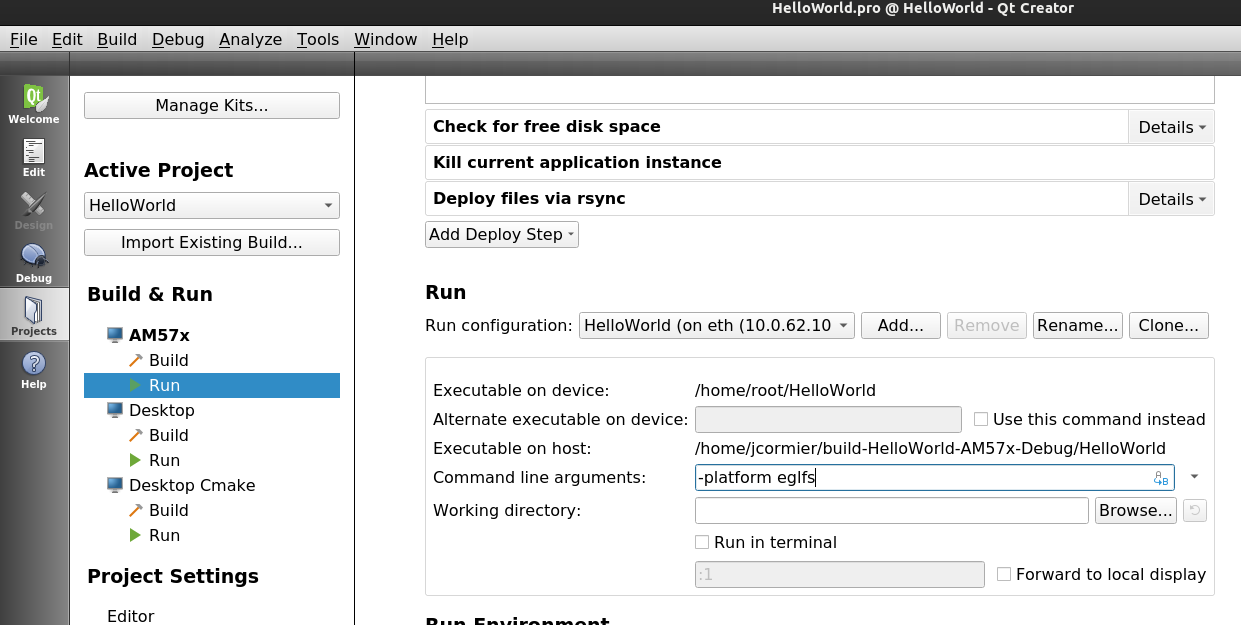
- Add "-platform eglfs" to command line arguments
Manually Building the project for ARM
If Qt Creator is having issues building, you can run the steps yourself. Otherwise, the QTCreator built files are usually found in the project folder in a folder named "build-<Kit Name>-debug"
- Open a terminal
source <SDK path>/environment-setup
- Navigate to the project directory
cd projects/HelloWorld
- Run qmake to allow Qt to generate a Makefile
qmake
- Run make to build the project
make
- The compiled file will be HelloWorld. Use the
filecommand to verify it was build for ARM> file HelloWorld HelloWorld: ELF 32-bit LSB executable, ARM, version 1 (SYSV), dynamically linked (uses shared libs), for GNU/Linux 2.6.16, not stripped
- Transfer file to the devkit. Replace <ip address> with ip of device. This will place the file in the home directory: /home/root/
scp HelloWorld root@<ip address>:
Running the GUI on the MitySOM-57x
- Run the application from the devkit
root@mitysom-am57x:~# ./HelloWorld
Using Wayland-EGL
Using the 'wl-shell' shell integration
Note: If you get an error "Running on a compositor with no screens is not supported" make sure hdmi is plugged in
Alternatively if you are not running wayland/weston, you can launch the GUI using "./HelloWorld -platform eglfs"
QT Tips
Easier cross platform builds
Placing the following in your projects .pro file allows for easier development of your application for running on both your PC and 57x.
contains(QT_ARCH,arm) {
    DEFINES += HOST_ARM
    CONFIG += arm # Add arm so we can use arm {}
}
It allows you to use #ifdef HOST_ARM in your code around sections that can't run on your PC. For example code that touches the gpio.
The "CONFIG += arm" line allows you to easily specify configurations in your .pro file that only apply when cross compiling. Example:
arm {
    SOURCES += arm_only_code.cpp
}
Have application show up full screen on 57x
- Add the following to the main window constructor. Assumes you've included the above tip.
#ifdef HOST_ARM
    this->showFullScreen();
#else
    this->setFixedSize(800,480);  // Set this to expected screen resolution
#endif
Go to top

