Example - USB Serial Console
Objective
This example connects the USB Serial Console port to a host system, powers up the development kit, and provides basic verification that the development kit is working.
Prerequisites
- A micro USB Cable
- A host system with a USB connection. (Windows or Linux PC)
- A terminal monitor program such as PuTTY or teraterm.
- PuTTY on Ubuntu 22.04 may need to add a user to the group dialout and specify a font. (Link to more info on the font issue)
Steps
- For windows, you will need to download the Silicon Labs virtual COM port driver for the CP2105 Dual UART to USB bridge chip. This interface provides 2 COM ports, one for the Cortex A-53 complex (linux console, the "standard COM port"), and a second for the MCU console UART (the "enhanced COM port").
- Plugin the USB cable into the USB-UART connector on the development board and the host system.
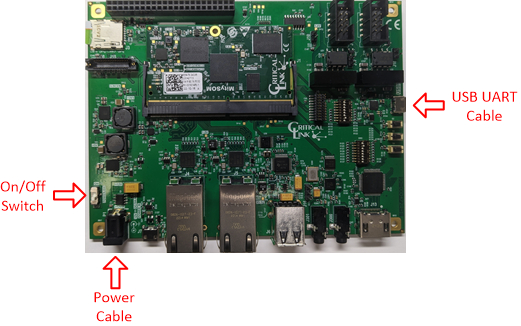
- Plugin the power cable for the development board.
- Turn the power on
- Connect Putty to the serial port. You will need to determine which serial port this is on your host PC (Windows or Linux). Something like /dev/ttySx, or, for windows "Silicon Labs Dual CP2105 USB to UART Bridge: Standard COM Port (COM5)".
- Specify the speed as 115200
- You should see output such as:
[   29.821930] Initializing XFRM netlink socket
[   32.878059] bridge: filtering via arp/ip/ip6tables is no longer available by default. Update your scripts to load br_netfilter if you need this.
[   32.899139] Bridge firewalling registered

***************************************************************
***************************************************************

 _____                    _____           _         _
|  _  |___ ___ ___ ___   |  _  |___ ___  |_|___ ___| |_
|     |  _| .'| . | . |  |   __|  _| . | | | -_|  _|  _|
|__|__|_| |__,|_  |___|  |__|  |_| |___|_| |___|___|_|
              |___|                    |___|

Arago Project mitysom-am62x ttyS2

Arago 2021.09 mitysom-am62x ttyS2

mitysom-am62x login:
mitysom-am62x login: root
root@mitysom-am62x:~#
- Login with a user id of 'root'. There is no password.
Conclusion
This completes this initial hands-on example. You now know that the development kit has basic functionality and can be logged into.